Showing posts with label Sound Mixing. Show all posts

Friday, July 17, 2015

My Newest Student Film (F3) is Done!

SO EXCITED!!!!


This post is a few weeks late, but after over 380 days my third student film is finally done!  The film is called "At the Feet of the Union" and is about a young Confederate soldier in the Civil War who is struggling with self doubt.  I've blogged about it before, especially during the visual effects cycle, but now that we have been through the sound edit, the color grade, and all the formalities of picture lock in the film school it is finally finished.

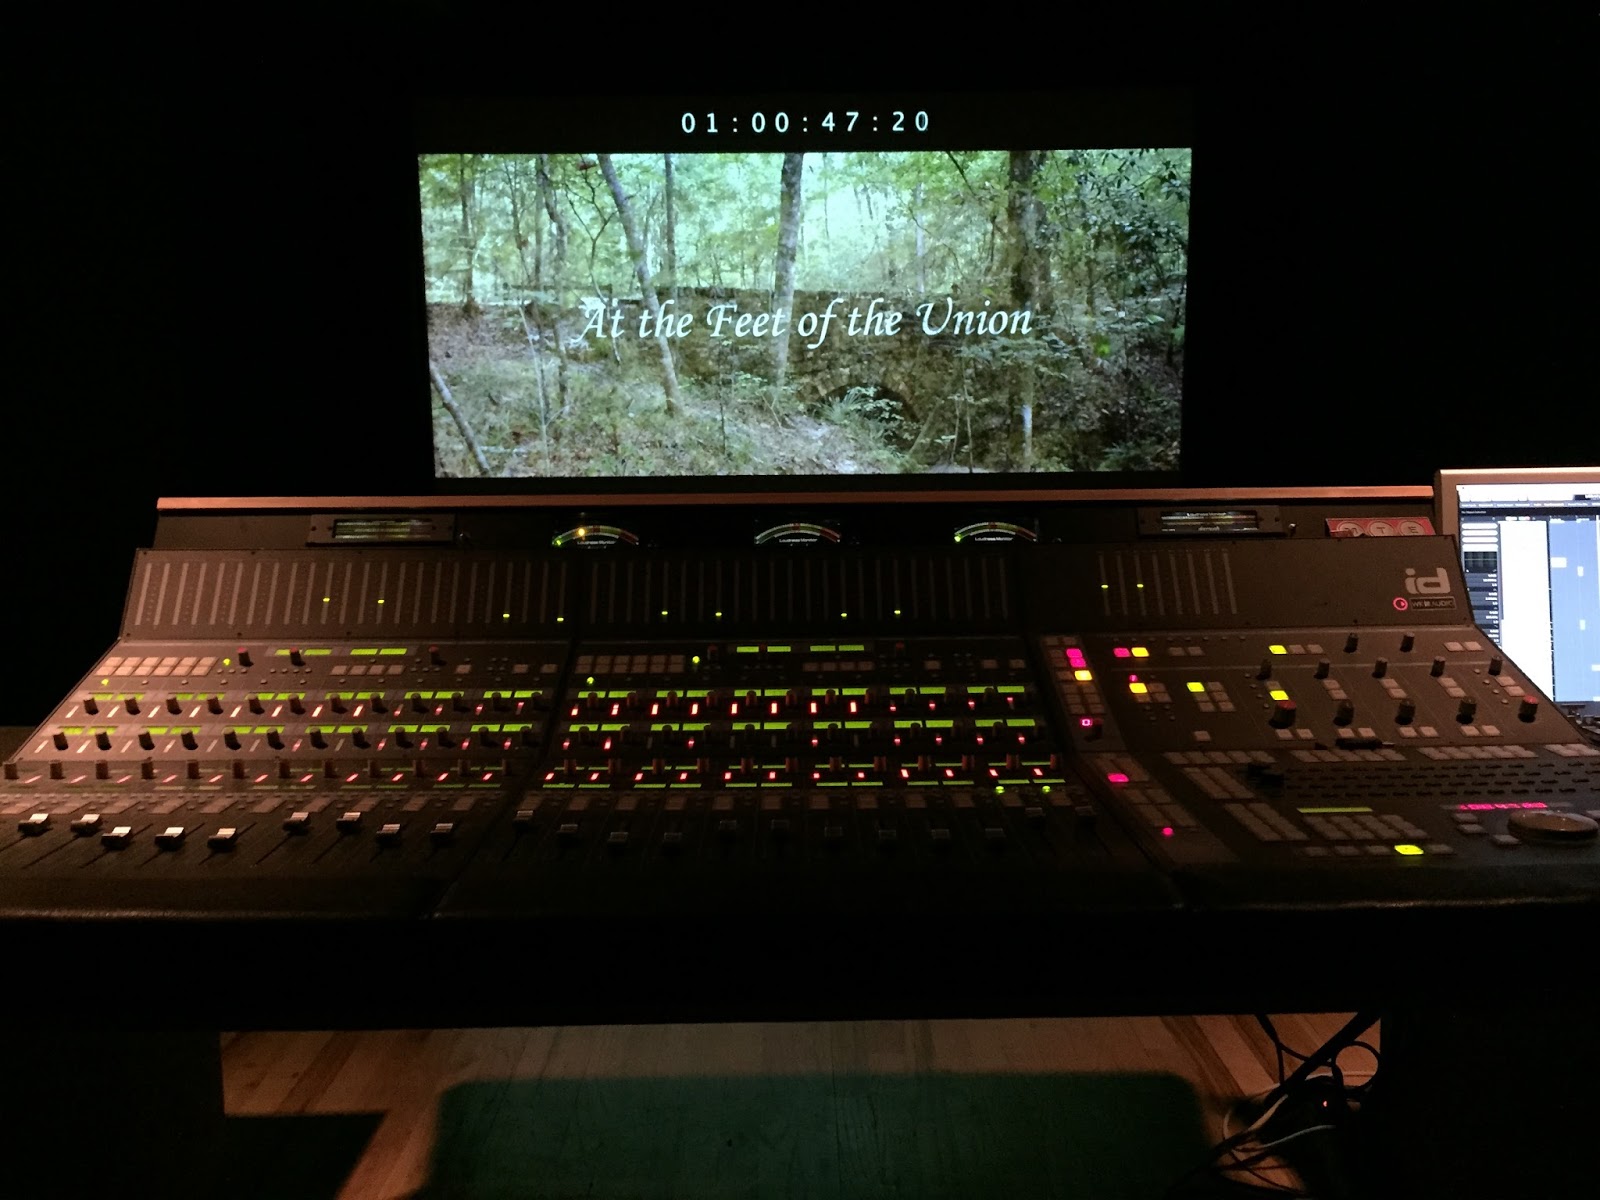
Mixing in the mix stage.
The sound edit was a one week process that started in a calibrated edit bay.  Most of my film was shot during a horrible rainstorm, so almost every single line of dialogue had to be replaced.  I recorded ADR several months ago in an isolation booth, so I already had a good head start on the dialogue edit: I didn't need to do much cutting and filling of white noise at all, which saved me a lot of time.  The school has a great sound library, which is where I pulled all of my backgrounds from.  For foley, I grabbed my friend Travis and spent a day in the school's foley booth.  The foley booth is a lot of fun.  There are multiple surfaces to walk on to create various footstep sounds and dozens of strange props and materials in there to make sounds.  We did all of the footsteps, clothes rustling, prop noises,  and body sounds in foley.  Finally there were a few hard effects I needed to add in, such as guns firing, and I grabbed those from the library again.  After the edit came the mix.  The mix was supervised by Chuck Allen, the post production supervisor at FSU.  Chuck has a career of experience in the music industry behind him and really facilitated the mixing process.  Sound editing is a creative process that is a lot of fun and has more to do with story than anything.  In my opinion, once you learn the basic tools your skill as a sound editor wholly depends on your creativity as a story teller and your understanding of soundscapes and how they can enhance a story.  Sound mixing on the other hand is a highly specialized and technical skill set.  Chuck took my edit and ran it through various auxiliary sends and returns and helped guide me through a strong mix in one of our mix stages at school.  He gave me creative control as far as volume levels and equalizers are concerned, but there is no way I could have done what he did to my film without him.  (We finished the film in a Dolby LTRT format, which I had never even heard of before.)  This experience really showed me the value in getting professionals to work on your film in the finishing department.


My DP, Victoria, working the control surface in Resolve.
Then we moved into color correction and grading.  This is one of my favorite parts of the post production cycle.  I just find it to be really fun and I have invested a lot of time into learning multiple color grading softwares.  This was the first time I got to grade a film in the full version of Da Vinci Resolve.  Previously I have only ever worked in the Lite version, but the full release gave us access to some very powerful noise reduction tools, which helped us out A LOT because at the time of shooting our F3s none of us had had any experience with the equipment package the school provided us.  I had a chemistry teacher in high school who would constantly tell us he believed the best way of learning was through exposure, and that is definitely the school's approach when it comes to gear.  They threw a Red Epic our way with some old 16mm lenses and basically said "have at it."  Each show we continued to learn more and more about the camera and the lighting gear we were using, but the noise reduction was a great tool to help us fix our mistakes.  For example, when it started pouring rain outside during our night exteriors, we lost the ability to light the scene because of the danger of water and electricity, so we pulled up a jeep and used its headlights in tandem with a practical fire on set.  We decided to go with a zoom lens so that we wouldn't have to change lenses in the rain.  A big problem with this was that we couldn't open up the T stop below a 3.5 or something like that, so we ended up with dark and noisy footage.  But if I had to go back and do it again I would make the same decision.  I believe that my DP and I made the best decision we could given the circumstances of the shoot, and the noise reduction really cleaned those night exteriors up.  It was great.  There's an odd little texture that comes from the NR sometimes, but it is WAY more tolerable and WAY less distracting than the noise, so it's just a tradeoff we had to make.

Technical processes aside, I want to talk about what working on a seven minute film for 380-some-odd days did to me creatively.  The production itself wasn't really 380 days: we took a huge break in the middle of that time to continue or regular classes, but that said the F3 was still very much on my mind during that time.  During the year of classes I took during the post cycle of my F3, I feel like I became a completely different filmmaker.  We had some really strong directing classes with Jason Maurer, co-director of the feature length animated film Delgo, and Antonio Mendez Esparza, writer/director of the award winning Spanish feature film Aqui y Alla (Here and There).  I also began an independent study with Jason (which I am still working on) during which we break down scenes from films and work on pre-visualization techniques.  Beyond that, I have really gotten to know our parallel class of students in the Production BFA program and have worked on several of their thesis films.  I feel that this year I had a lightbulb moment, where suddenly some things started to click.  The visual grammar of film, as Martin Scorcese calls it, is really starting to make sense to me and because of a particularly laborious film seminar I went through this year I believe I have much firmer grasp on the core principles of storytelling as a screenwriter.  So the bright side is that I feel like I am a better filmmaker than ever.  The downside is that these discoveries I have made and the things I have learned all taint the way I look at my F3, and when go back to work on sound or color or visual effects or whatever, I just can't stop looking at what I consider to be my mistakes.  Having to constantly go back and analyze and critique my seven minute film for an entire year was a surprisingly difficult experience.  It really made me question my own talent and abilities and really resulted in a lot of soul searching.  It's really hard to adopt a constructive mentality when you know that you won't be shooting your next short film for months and months to come.  In short, I never want to go through a process where I spend so long on something so short ever again.  It's destructive to morale, and doesn't create any opportunities to keep practicing and improving.  I hate to say it, but I don't like watching this film anymore.  I'm not exaggerating when I say that I believe I have watched it over 500 times.  Mistakes should encourage you to be better in your next endeavor, but in this case that encouragement disappeared quickly because there was no end in sight, and the mistakes became like weights looming over my head for a year.  That said, now we are DONE and I am more confident than ever in my ability to make a great new short film moving forward into thesis.  I'm an optimist, and even though the whole F3 process was arduous, I hands down believe that I learned way more from that process than if everything had gone smoothly and I was happy with my end product.  Not only have I learned to become a better filmmaker in terms of blocking, shot selection, cinematography, etc, but more importantly I have learned how to handle high stress situations, how to deal with malicious criticisms, how to adequately self-critique myself, and how to persevere and dig myself out of a creative rut.

Now... on to thesis!

Saturday, March 29, 2014

The Making of "Starfishing" - A Behind the Scenes Blog: Part 3

Well, here at FSU we just wrapped production on our second student films, so I think it is high time I finish writing about my first student film.  This blog will focus on the post-production process for my F1.  While I would love for people to learn something form this blog, I'm not treating it as a tutorial so I won't go too deep into anything technical that I did.  But if you have any questions, as always feel free to ask! :)

Post-Production


With Production wrapped, and one quick weekend to wind down, it was time to enter the lab.  The lab can be interesting.  My school has two computer labs: a mac lab and a PC lab.  Both labs are connected to the same server and have all the same software installed, but the PC's are stronger machines.  Unfortunately with that being the case, the upperclassmen claimed the PC lab as their own, not letting us in without some form of right of passage.  But it's really okay, the macs are great machines too and I personally likes OSX better than Windows anyway.  The lab can be a fun place... Lock 15 film students in a room full of computers for about 50 hours and you will get some interesting results.  I'll leave it at that.  The lab was where I went through the first stage of post production: the edit.

The Edit


For "Starfishing", I shot around 80 minutes of footage.  All of this had to be taken off the camera card and brought onto the computers.  For this, I used Adobe Prelude.  Prelude can seem like a worthless program sometimes if you have ever used it before, and honestly I didn't even take advantage of it really when editing my film.  But it did serve one immensely useful purpose.  The Canon XF305 initializes the CF cards in such a way that it stores each clip in a separate folder.  If you were to simply drag on drop the clips off the CF card straight into your editor, you would have gotten a hundred bins inside your project window and you would have had to open each one individually to find all your footage.  Using Prelude bypassed this problem.  Prelude pulled all the clips out of the folders for me and allowed me to name each clip before shipping them off to my editor, Adobe Premiere.

Once in Premiere I started editing right away.  The first cut of my film went really well, but I did face a small internal battle.  I knew we were going to have to screen our first cut to faculty, so while I really wanted to smooth out all of my audio cuts, I was afraid it would be a huge waste of time because I was just going to have to recut a lot of it anyway.  But I did it anyway and made my audio sound nice and smooth... and sure enough, after getting some GREAT feedback from faculty, smoothing out the audio proved to be totally worthless as I had to redo it all again anyway.  I went through five cuts of the film before I was satisfied with what I had.  In the first cut, my professor rightly pointed out that I rode on way too many close ups.  Instead of cutting to close ups to make an emotional impact, they served as my primary source of dialogue coverage.  So in my second cut I worked really hard to fix that, but as a result I think I had way too many wide shots and not nearly enough close ups.  In my third cut, I think I finally found a nice balance.  Then came the fourth and fifth cuts, by far the hardest.  Getting everything down on my timeline was easy, but by the time I reached my fourth and fifth cuts all that was left to do was fix some minor issues or improve small areas I wasn't quite happy with.  Sometimes the difference between a bad cut and a great cut can be just a few frames, and that's what the fourth and fifth cuts came down to: fixing the tiniest issues in an attempt to make a huge impact.  I believe in my fifth cut I ended up only making one chance from my fourth cut, but figuring out that one change took just as long as laying down my entire first cut did!  The devil's in the details, that's for sure.  Once I finessed the edit, I was able to move on to the visual effects.

The Visual Effects


The visual effects in this film were pretty small, and to pull them off I used Adobe After Effects and Adobe Photoshop.  The only VFX shots in the film are the shots involving Hope's power cell.  To pull off the effect, I made a battery graphic in Photoshop and then motion tracked it onto the prop in After Effects using Corner Pin tracking.  Then I just changed the blend mode, slapped some glow on there, and did any necessary rotoscoping (altering the shot frame by frame) work needed to make sure it passed beneath Hope's shirt.  Finally I had to mess with the opacity keyframes in the shot where the battery flickers off.  It was all around a pretty simple shot and I'm super happy with how it turned out.

The Color Grade


After my cut with visual effects was complete, I was able to move on to possibly my favorite part of the post production process: color.  I graded my film in Da Vinci Resolve using the schools Tangent Wave board, and let me say, I was BLOWN AWAY by the awesomeness of this program and this board.  It has spoiled me and I hate color grading on anything else ever since.  To grade the film, I made a new timeline in Premiere and flattened it all down to one video layer, then I deleted the sound and exported the sequence as an EDL.  In Da Vinci, I imported all of my source media from the server and then imported the EDL and reconnected all the edits in the conform window (now the "edit" window in Resolve 10).  The grade itself was really two steps: first I went through and matched the color of all the shots.  This was essential because as we shot outside, the light from the sun was always changing due to cloud cover and time of day.  Matching all the shots was essential.  For this task I relied mostly on the scopes, matching each clip to the clip from that scene that I liked the most. After I completed the color correction, I moved onto the creative part of the process which is the grade.  First, I added a lot of emphasis on my characters faces by tracking some power windows over their heads and raising the levels.  Second I adjusted the overall color balance of the image. Then I adjusted all of the contrast to something I was happy with.  For a lot of the shots, to accomplish the right contrast I used a technique designed to emulate a bleach bypass by creating a layer node, desaturating the top layer, and then chaining the blend mode to overlay.  This effect can sometimes look amazing, and in a lot of my shots it really did.  Finally I went through and sharpened a lot of shots, especially around the eyes.  Adding a sharpening power window around a characters eyes really makes them pop, a trick I learned from colorist David Lindberg.  Check out his website, http://lindbergdavid.com for some great inspiration.  Once I completed all of these steps (which took about two entire days) I exported my footage as uncompressed 4:2:2 8-bit (what the Canon XF305 shoots in) and brought it back into Premiere.  Now it was time to move onto audio.

The Sound Mix


For my sound mix I used Adobe Audition.  I like to think of sound as one of those areas that I think I know a lot about but I really don't.  Every time I think I learn how to do something really cool, I listen to some reference of professional mixes and realize how crappy mine really is.  Reference is so important: when you are sitting in a sound room by yourself listening to nothing but your own mix for 6 straight hours, you start making some decisions that you think are great.  Then you leave for 2 hours to grab some lunch, come back, give it a listen and want to slap yourself in the face.  My biggest piece of advice for sound mixing: unless you are a professional, educated mixer, listen to professional mixes for reference and try to match them.  It will help you a ton, and this is something I WISH I had done during "Starfishing."  Instead I tried to mix it myself, which proved to be a huge challenge.  Nonetheless, after 4 or 5 days in the mixing room banging my head on the desk wondering why nothing seemed to work, I think I came out with something pretty decent compared to what I started with.  The natural sound of the alleyway was horrible, and I did a fairly good job I think of pulling a good amount of that sound out of the shots.  I pulled enough anyway to make the dialogue at least understandable, which I was satisfied with after 4 days of going nowhere.  I ended up using a notch filter to pull out background sound.  The notch filter identifies specific frequencies and eliminates them with a little bit of falloff on the surrounding frequencies.  It worked wonders in my alleyway in ways that noise reduction could never dream, and when paired with track EQ's and the sound effects, I think it turned out alright.  Something that was really fun about the sound mix though was my foley sound effects.  Our school has a foley booth set up with all kinds of interesting things to make interesting sounds with.  I set up a couple of microphones and recorded some great footsteps, rustling clothes, impacts, breathing, and other various sound effects to use in the film.  This was actually a lot of fun, and I could see myself hanging around the foley guys on some film someday just to have fun.  I also downloaded a lot of sound effects from Creative Commons websites, which were promptly credited in my film.  It all came together to make a decent overall mix, although the sheer amount of on set noise just made it difficult to hear some of the lines, no matter what I tried in post.  So this is the part of the blog where I obligatorily state to all budding filmmakers: get good audio on set.  You won't regret it.  I wish we had been permitted the use of lavalieres on the F1 set, and also I wish our school had a sound blimp to put over our shotgun microphones.  I think that would have made a huge difference.  Nonetheless, I think what I ended up with was pretty good, and I'm proud of all the work I put into the mix :)

•          •          •

Well, today is March 29, 2014, two whole days after taco bell breakfast has been released and I still haven't even tried it.  I think I'm gonna head that way now and try one of those AM crunch wraps before heading back to the lab to do everything I just talked about again on my second student film.  Oh the life of a film student - it really is awesome :)

Sunday, February 16, 2014

Weekend Project #7 - Hearing Things

At long last!  I have gotten around to posting my seventh and final weekend project.  I love posting these weekend projects and sharing them with you guys - however small an audience you may be - however, I must confess, I have been really eager to finish posting these weekend projects so I could start posting some of the really cool stuff we have been up to here at FSU film.  I wanted to post these weekend projects before anything else, so that chronologically in the archive they would be my earliest posts.  They are the first things we did at film school, an honestly they don't compare in quality to anything else we do here, so I want them to almost hide deep in the archive, where they shan't ever be found…

Okay so I'm partly kidding.  I take pride in all of my work, and would show any of these weekend projects to anyone on any day, buy I am absolutely stoked to be done posting them and get to move on to some of the much more awesome work I have been up to.  So with that being said, let's get on with this post.

This project was all about using offscreen sounds to propel a story forward.  I decided to take on the additional challenge of mixing the entire project within my NLE, Adobe Premiere Pro, instead of bouncing it into an audio DAW like Adobe Audition.  I must say, Premiere was much more capable with the audio than I think most people give it credit for, although it is still no Pro Tools or Logic.  So without further ado, here is the project!


We downloaded all of our sounds from Creative Commons websites, which means that they are free to use as long as we credit the original artist.  As a quick breakdown into my workflow, I first mixed whatever in camera sound I wanted to keep, which was mostly a little bit of ambient noise and Victoria's grunt when he hits the ground.  I made sure it all flowed together smoothly without any cracks or pops and then sent it all into a bus.  Then I started layering on my sound FX that I downloaded from the creative commons sites and positioning them in the right places.  Then I adjusted the volumes of everything, routed all my sends and returns, keyframed the overall track volumes of the bus tracks, normalized everything to -3db, and viola.  A short film mixed in Premiere.

As much as I learned about the mixing capabilities of Premiere in this project and also about the importance of sound as an element in our stories, I learned a lot more through the very nature of this project.  From the moment my second weekend project got slammed by my Professor until the end of the weekend project cycle, I looked at each one as a learning experience and tried to learn as much as I possibly could from each one.  I didn't care about the quality of the finished product nearly as much as I cared about the elements that we were learning in each video.  But through all of that, I lost sight of one of the most important pieces of filmmaking: HAVING FUN.  Taking the mindset I had, I went in to each weekend project viewing it more like a homework assignment than an opportunity to make a movie.  At my school, my homework isn't calculus or European history; my homework is MAKING MOVIES.  How cool is that??  For this project, my entire crew just threw their arms up and basically said "screw it, let's have fun" and instead of meticulously planning everything out and being very picky, we all had so much fun.  We made this project up as we went along, as opposed to the other projects which were storyboarded out cut by but.  We came up with ideas spontaneously on set that were awesome, even though some of them didn't work out.  We saw a train track and decided to film on it, which might be illegal, but I wasn't really sure so we just went for it.  This project was so much fun, and one of those moments that I realized that if you don't put your heart and soul into what you are doing, you won't ever be successful or more importantly, create good art.  Filmmaking is a balance between the technical and the creative, and I have discovered that both sides flourish the most when passion is put into them.  When you're truly passionate about what you're doing, you're going to have fun doing it, and that's a fact.

Thursday, December 19, 2013

Weekend Project #4 - The Pursuit

I know that I'm way behind schedule on this blog, but now that semester break is here I'll be trying to catch up as much as possible, so I'll probably put weekend projects 4-7 on here almost back to back  to back to back!

This project was a lot of fun to shoot.  Just a simple chase scene, but that gives you such much freedom as a director to just have fun with it.  So here is my project "The Pursuit"!


In this project I really wanted to focus on foreground objects.  Placing elements in the foreground in front of your actors in the midground can really add so much depth to the frame.  In a chase scene, it also adds a lot of opportunities to hide your cuts and have some really great transitions from shot to shot.  In this video I would cut on cars a lot, giving the illusion that if the girl ran behind the car the guy came out the other side.  Curiously, our minds understand that there was a cut made there and that there was no teleportation magic, even though the cut is hidden.  I'm not really sure why that works but it does, and it is a great tool to keep in your arsenal as a director.

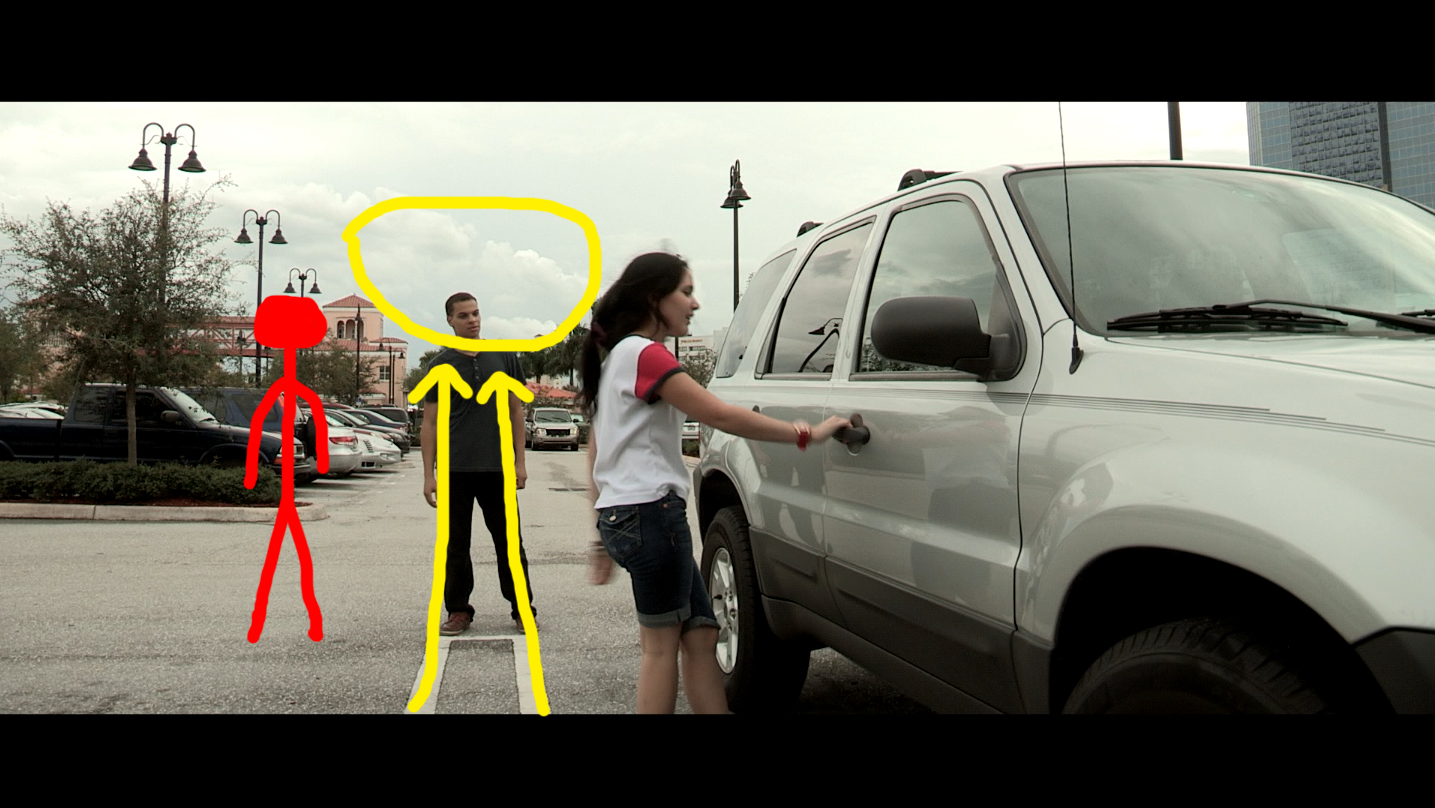
Also, my last shot is a shot where I went against my gut and did what my instructor and I had talked about after my third weekend project.  If you flip back to my post on weekend project 3, you'll see that I talk a lot about a shot where I could have framed my actress in a clear patch of sky, but instead I  placed her right in front of a tree.  On my last shot in this project, my gut told me to have a good amount of spacing between my two actors.  But when I did that, I lost the detail of my actor's face in trees, skin-tone buildings, and light posts.  I decided to squeeze my two characters closer together, against my initial desire, and the result was great!  Take a look at the screenshot below:


The red stick figure represents where I wanted to frame the actor.  Look at how cluttered that area of the frame is.  Instead, I have this nice patch of sky which, as luck would have it, neatly vignette's his head with a nice circular arch.  In addition, the lines from the parking space lead straight up to that circle on either side of his head, giving us vertical framing lines in addition to the vignette frame.  I think this shot turned out awesome and I am really glad that I was able to use what I learned from my last weekend project to make this one better.

CONTINUITY


When I screened this project to some classmates and my parents, a common criticism I received was that the distance between the two runners was always chaining, and they could never gauge whether or not the pursuer was catching up or not.  To be honest, this is something I totally neglected on set.  It is so easy to get caught up in each individual frame and lose sight of the picture as a whole.  This is just something for all of us to keep in mind of in the future.  Continuity is extremely important.

SOUND


On this project I decided to give Adobe Audition a go for the first time.  I had used it briefly before but had never tried mixing in it.  Being familiar with Garage Band and also live sound mixing (I used to run boards for my church in the past) was a huge help coming into Audition.  I learned a lot about sub mixing through bus tracks and limiting/normalizing audio to proper peaks.  I still have a lot to learn, and I have been watching some Lynda tutorials on the proper ways to mix film in any standard DAW, and trust me it is no easy task.  Hopefully I'll be able to write and in depth blog on it in the future.
As for the music, I recorded the guitar parts straight into audition in a new multitrack session.  I made the string tracks and percussion tracks in Garage Band using the Main Stage jam packs, then bounced those back into audition to do some mixing.  I find that the limited mixing tools in Audition are superior to the many in Garage Band.  Compression and Reverb applied in Audition helps the drum tracks bounce right back into the real world, not sounding like MIDI anymore, as opposed to compression and reverb in Garage Band which leave things sounding digitized.  Then I bounced that multitrack session to a new file and brought it back into my regular sound mix which included my dialogue and sound effects.  Then viola - a finished mix.
After mixing this project in Audition, I was quite impressed with its capabilities, especially considering it is a DAW no one ever talks about.  The only DAWs anyone ever seems to mention are Pro Tools, Logic, Ableton, and Reason.  I hear some talk of Cubase too and I know some kids with copies of FL Studios, but in all honesty it seems like the Pro Tools is king.  That being said Audition was a far superior mixing tool to Premiere and Garage Band, so I am curious to see what any pros think of it, though I am hard pressed to really find any reviews online.  I encourage all of you to give Audition a try!

Again, for my few readers out there sorry I've been gone so long.  Three more weekend projects to post and then I can start getting into the good stuff!