This post is a few weeks late, but after over 380 days my third student film is finally done! The film is called "At the Feet of the Union" and is about a young Confederate soldier in the Civil War who is struggling with self doubt. I've blogged about it before, especially during the visual effects cycle, but now that we have been through the sound edit, the color grade, and all the formalities of picture lock in the film school it is finally finished.
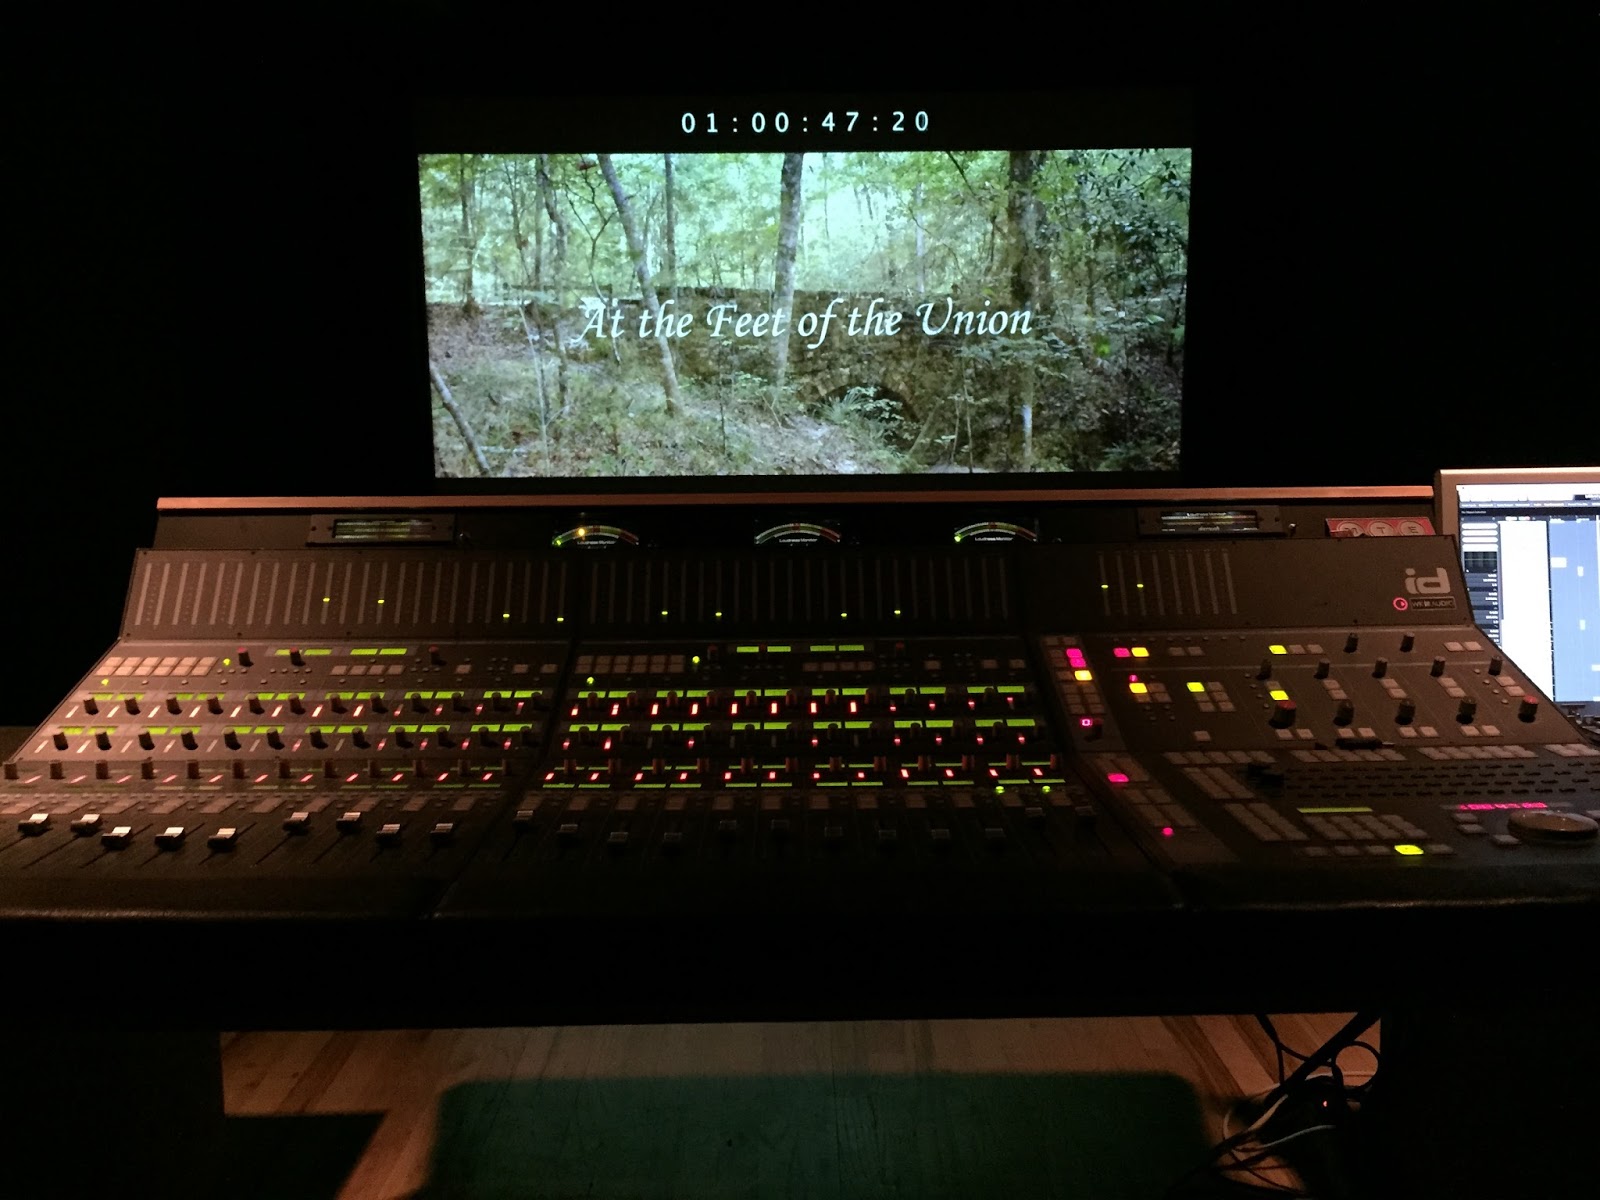
Mixing in the mix stage.
The sound edit was a one week process that started in a calibrated edit bay. Most of my film was shot during a horrible rainstorm, so almost every single line of dialogue had to be replaced. I recorded ADR several months ago in an isolation booth, so I already had a good head start on the dialogue edit: I didn't need to do much cutting and filling of white noise at all, which saved me a lot of time. The school has a great sound library, which is where I pulled all of my backgrounds from. For foley, I grabbed my friend Travis and spent a day in the school's foley booth. The foley booth is a lot of fun. There are multiple surfaces to walk on to create various footstep sounds and dozens of strange props and materials in there to make sounds. We did all of the footsteps, clothes rustling, prop noises, and body sounds in foley. Finally there were a few hard effects I needed to add in, such as guns firing, and I grabbed those from the library again. After the edit came the mix. The mix was supervised by Chuck Allen, the post production supervisor at FSU. Chuck has a career of experience in the music industry behind him and really facilitated the mixing process. Sound editing is a creative process that is a lot of fun and has more to do with story than anything. In my opinion, once you learn the basic tools your skill as a sound editor wholly depends on your creativity as a story teller and your understanding of soundscapes and how they can enhance a story. Sound mixing on the other hand is a highly specialized and technical skill set. Chuck took my edit and ran it through various auxiliary sends and returns and helped guide me through a strong mix in one of our mix stages at school. He gave me creative control as far as volume levels and equalizers are concerned, but there is no way I could have done what he did to my film without him. (We finished the film in a Dolby LTRT format, which I had never even heard of before.) This experience really showed me the value in getting professionals to work on your film in the finishing department.
My DP, Victoria, working the control surface in Resolve.
Then we moved into color correction and grading. This is one of my favorite parts of the post production cycle. I just find it to be really fun and I have invested a lot of time into learning multiple color grading softwares. This was the first time I got to grade a film in the full version of Da Vinci Resolve. Previously I have only ever worked in the Lite version, but the full release gave us access to some very powerful noise reduction tools, which helped us out A LOT because at the time of shooting our F3s none of us had had any experience with the equipment package the school provided us. I had a chemistry teacher in high school who would constantly tell us he believed the best way of learning was through exposure, and that is definitely the school's approach when it comes to gear. They threw a Red Epic our way with some old 16mm lenses and basically said "have at it." Each show we continued to learn more and more about the camera and the lighting gear we were using, but the noise reduction was a great tool to help us fix our mistakes. For example, when it started pouring rain outside during our night exteriors, we lost the ability to light the scene because of the danger of water and electricity, so we pulled up a jeep and used its headlights in tandem with a practical fire on set. We decided to go with a zoom lens so that we wouldn't have to change lenses in the rain. A big problem with this was that we couldn't open up the T stop below a 3.5 or something like that, so we ended up with dark and noisy footage. But if I had to go back and do it again I would make the same decision. I believe that my DP and I made the best decision we could given the circumstances of the shoot, and the noise reduction really cleaned those night exteriors up. It was great. There's an odd little texture that comes from the NR sometimes, but it is WAY more tolerable and WAY less distracting than the noise, so it's just a tradeoff we had to make.
Technical processes aside, I want to talk about what working on a seven minute film for 380-some-odd days did to me creatively. The production itself wasn't really 380 days: we took a huge break in the middle of that time to continue or regular classes, but that said the F3 was still very much on my mind during that time. During the year of classes I took during the post cycle of my F3, I feel like I became a completely different filmmaker. We had some really strong directing classes with Jason Maurer, co-director of the feature length animated film Delgo, and Antonio Mendez Esparza, writer/director of the award winning Spanish feature film Aqui y Alla (Here and There). I also began an independent study with Jason (which I am still working on) during which we break down scenes from films and work on pre-visualization techniques. Beyond that, I have really gotten to know our parallel class of students in the Production BFA program and have worked on several of their thesis films. I feel that this year I had a lightbulb moment, where suddenly some things started to click. The visual grammar of film, as Martin Scorcese calls it, is really starting to make sense to me and because of a particularly laborious film seminar I went through this year I believe I have much firmer grasp on the core principles of storytelling as a screenwriter. So the bright side is that I feel like I am a better filmmaker than ever. The downside is that these discoveries I have made and the things I have learned all taint the way I look at my F3, and when go back to work on sound or color or visual effects or whatever, I just can't stop looking at what I consider to be my mistakes. Having to constantly go back and analyze and critique my seven minute film for an entire year was a surprisingly difficult experience. It really made me question my own talent and abilities and really resulted in a lot of soul searching. It's really hard to adopt a constructive mentality when you know that you won't be shooting your next short film for months and months to come. In short, I never want to go through a process where I spend so long on something so short ever again. It's destructive to morale, and doesn't create any opportunities to keep practicing and improving. I hate to say it, but I don't like watching this film anymore. I'm not exaggerating when I say that I believe I have watched it over 500 times. Mistakes should encourage you to be better in your next endeavor, but in this case that encouragement disappeared quickly because there was no end in sight, and the mistakes became like weights looming over my head for a year. That said, now we are DONE and I am more confident than ever in my ability to make a great new short film moving forward into thesis. I'm an optimist, and even though the whole F3 process was arduous, I hands down believe that I learned way more from that process than if everything had gone smoothly and I was happy with my end product. Not only have I learned to become a better filmmaker in terms of blocking, shot selection, cinematography, etc, but more importantly I have learned how to handle high stress situations, how to deal with malicious criticisms, how to adequately self-critique myself, and how to persevere and dig myself out of a creative rut.
I love this quote. It is literally four extremely simple words stuck together into an extremely simple sentence, but it encompasses so much more than the simplicity could ever imply. Filmmaking is all about passion, and if you don't have it, it will show. In the context of the interview, JJ was asked, "Do you have any advice for young filmmakers?" to which he answered, almost dumbfounded by the question as if the answer was obvious, "Go make your movie!" He then began rambling on about how easy it is for the kids of my generation to pick up a video camera and start shooting movies, whenever they possibly can, and how that will build the passion that you need to succeed. This concept was in the back of my mind throughout the entire production cycle of "Starfishing"; this wasn't a student film that I was making for a grade, this was my movie that I was making because I wanted to. Treating it that way is the first step to becoming immensely passionate about your project, and it's that passion that will drive you (as it drove me) to stay up all night in the lab, to put in the extra hours in the color suite, to do your own foley sound recording, to properly mix and master your soundtrack, to edit and re-edit your film five, six, seven times; having passion is the first step in the production cycle, everything else is all just sticking to your guns and following through.
PRODUCTION
The policy at FSU for F1 production is that you get one 12 hour day to shoot with a one hour break at the halfway point for lunch, totaling to 13 hours. The faculty are very strict on the schedule, meaning that not only are you done shooting by the 13th hour, but that you are completely packed up and disappeared by the 13th hour, as if you were never there in the first place. This obviously creates a time crunch, but once preproduction is complete, the actual physical production of the film is a relatively straight-forward process. Assuming you did your homework in preproduction, what you do on set as a director should feel completely natural and, in theory, everything will run smoothly. This isn't to say there aren't any snags - on the contrary, you will always, ALWAYS, run into problems on set. In all the sets I've been on in film school, something has always gone wrong. During the filming of "Starfishing", one restaurant bordering the alleyway had their septic tank pumped, so for about two hours we couldn't use the alley; another restaurant was having their grand opening, but their kitchen wasn't finished yet so all day chefs and construction crew were coming in and out right by our set and making A LOT of noise; we filmed the third scene of the film - when Hope is running around like crazy - first, but then it started pouring rain, so we filmed the whole scene again in the rain; our extension chords weren't long enough to reach our set during the night shoot, so we had to move the whole set down the alley to a backup location that wasn't ideal (but ended up working really nicely); and finally, filming in a city by a crowded city street meant noise, and A LOT of it - a lot of really great takes were ruined by car horns or street noise or passerby's. All this goes to show that when filming a film, expect that nothing will go right. I mean this honestly: if you do that, you will remain mentally stable when nothing does go right and become mentally awesome when things do go right.
As I mentioned above, the physical production is a relatively straight forward process. So what I will do is talk a little bit about some of the directorial decisions I made during production, but mostly just show a lot of photos from the production. The photos are fun and they capture what the essence of the production was like much more than my descriptions can.
WORKING WITH ACTORS
The hardest part for me during production was remembering that the performances of my actors are worth a lot more than the frame they are staged in. That's why a black and white movie from the 1930s can still hold merit today, even without the amazing technology we now have. This was probably the single biggest thing that I learned during my first semester at film school, and it was very difficult for me to hand off the camera to my crew and then walk away and work with my actors. Trusting that they were going to set up the scene the way I pictured it in my head was difficult to do, but the detailed storyboards and floor plans from preproduction made it easy for them and the results they got were incredible. While working with my actors, I would always walk away from the set and then just let them rehearse the scene. I would give my input and then they would go again. From my classes, I was encouraged to never read a line to an actor. "We want inspiration, not imitation," my professor said. This was difficult for me - it was a new way of working. But I trusted my professors and the result was outstanding. By giving my actors motivations, stakes, and objectives - as opposed to where I desired various inflections and pauses and changes in volume - I was truly able to mold and shape their performances to help them jump off the page. Once we did get back to set to start shooting, I would do the same thing: after each take, a little praise, a little critique, and then right back at it. And on the note of praise, I can't stress how important that is. No actor likes to sit there and be critiqued all day. Besides, odds are your actor is a much better actor than you! Praise your talent for every good thing they give you. It really improves the morale of the set and helps their performances reach the next level.
Working with actors away from the set was an important part of the process.
Ryan, truly focussed. Nikki... uh....
Big shout out to Nikki for being a trooper through the freezing, wet day.
Ryan waiting for us to finish building the set.
Performing a scene.
Working with Nikki.
It really was a wet day. The umbrellas were super helpful.
"Ryan you do what I tell you or else!"
CHOOSING THE FRAME
Despite the fact that I trusted my crew to set the initial frame while I worked with my actors, the frame was still very important to me. The frame to me is much more than the relative positioning of actors and the camera on set though. To me, the frame involves all the technical aspects as well, ensuring that I can have the best possible image quality and color to support the feel of my film. Something I brought with me to set from my background in shooting DSLR filmography was the importance of proper exposure. We shot our F1's on the Canon XF305, which is a broadcast quality camcorder. From my understanding, it is aimed primarily at news crews. The XF305 would be absolutely fantastic for documentary filmmaking, but can really be hard to work with on a film set, especially when coming from a DSLR background. Some key functions we are used to like ISO, Picture Style, Color Space, and interchangeable lenses are entirely gone. Others like aperture, shutter speed, and focal length are present but entirely different. However, a bright side to the XF305 is it's picture quality. Unlike DSLR's which shoot in the messy h.264 codec, the XF305 shoots its own MXF format, which is a wrapper for some from of MPEG-2. I'm not entirely sure how it works but the bottom line is that the clarity is AMAZING. You don't get the pixel dancing on the XF305 that we might be used to on the Canon EOS DSLR series, including the 5D Mark II at times. But the downside to this is how slow the lens is on the XF305. If you turn off the lights you just aren't going to see anything. Period. My solution to this was to shoot my film at a completely neutral exposure, drop the camera gain to the lowest possible setting (even lower than the default "Low" setting), and to use tons and tons of on set lighting. This kept my actors bright even in the even of having to underexpose a shot to keep detail, kept all noise out of the shot, and kept my colors as neutral as possible for leeway in post.
Another decision I made about my frame was to shoot in a 2.35 widescreen format. The downside to letter boxing 1080p video to appear to be shot in anamorphic widescreen is the loss of data: by doing this I effectively cancel out about 33% of my frame. But I chose the widescreen because I believe that widescreen can greatly add to the feeling of isolation and desperation when used properly, which I believe really paid off in my third scene. I also believe it lends itself to tension more than a full frame. When you look at a square and a rectangle side by side, which appears to have more action? I believe that narrower frames add an inherent dynamic to the composition that seems to imply complexity mores than a full frame. Finally, I believed that by cropping a third of my image out of the frame, I would help to hide the shortcomings of the XF305 and thus help keep my audience interested in the story as opposed to being thrown off by poor quality video. Shooting on the XF305 meant overexposing a lot of skies to keep my actors bright. Cutting out those skies threw my audience's focus completely onto the characters - which is what is important - on top of placing them in a medium they are more accustomed to seeing (most films are shot widescreen), all adding to what I hope is an increased immersion in the film.
Finally came the actual composition of the frame, which is the most important part of all. My storyboards were very helpful during this part of production, and for the most part my director of photography, Victoria, nailed the framing every time. I simply handed her my board, showed her where I wanted the frame on set, walked away to work with my actors, and when I came back it was done. This also applied to lighting. I would tell Victoria what kind of look and feel I wanted and when I came back the lighting would be almost spot on. As for lighting though, I had a very specific plan in mind. I really wanted to stress the depth of the alley, so I threw really cool blues into the background while keeping he foreground warm. I also really wanted to showcase the grittiness of the world while staying true to reality. This was difficult, because in real life alleyways have soft, overhead, tungsten lighting but I wanted a really hard lighting feel. It was a difficult balance between finding my light source and applying just the right amount of diffusion, but my gaffer Grace Colley did a great job. Obviously, there was a lot of tweaking throughout the day, in both the framing and the lighting. No one can exactly match my vision without being in my head, it's not philosophically (or physically) possible. My general on set workflow, therefore, went a little something like this: at the start of a new setup I would show Victoria the storyboard and light plan and explain to her what I wanted. Then I would walk off set and work with my actors while Victoria would work with the crew to set up the set how I wanted it. When it was done, my assistant director Justin would come and get me and the actors and bring us to the newly built set. I would then place my actors where they needed to be and do some rough blocking, then tweak the camera and lights until they were perfect and start rolling. At the end of a setup we would tear it down and start all over again.
My Director of Photography, Victoria Cragg
Boom Operator Elangie Pereda works with Victoria.
Checking the frame.
Elangie booms a wide shot from far away.
"Who wrapped this cable grrr..."
Ta Da!
A wide shot of the set
Victoria filming a shot.
Cinema? I direct dat.
Grizzly. Et Syder y Razza.
Getting ready to roll!
You can see the 2.35 widescreen bars farming Ryan.
Cool DIY dolly rig.
Victoria goes hard.
The start of the night shoot.
Directing at night.
Deeply thinking... I'm sure it's about dinner.
Shooting into a light always looks cool.
• • •
I hope you guys enjoyed this post and that it didn't get too dry with some of the technical stuff there in the middle. I know in my last post I said I would touch on post-production in this post also, but I think this post just reached a point where it got too long. I never want my posts to dry out by the end, and if I am reaching that point please let me know in the comments! Finally, I just want to make one remark about all of the pictures: one crew member who is missing from all of my pictures is my gaffer, Grace Colley, and that's because she's the one taking the pictures! So a huge thanks to Grace for taking all these awesome pictures for me, I really do love all of them! On that note, keep checking in for my next post on the post-production process and then what will be my fourth and final post in this BTS Blog which will touch more on the personal side (the -losophy) of the film for me. Thanks again for reading and showing your support :)
In my most recent post, I showed you all my first student film here at FSU, titled "Starfishing", and made a little promise at the end that I would write a few more posts on the film. I want to go ahead and make good on that promise and dive into the film right now :)
A fair warning - making a film involves creative and technical stages, and making a good film involves taking command of them both. These looks into my thought process will include both sides of that equation, and if you have no interest in the numbers and technical know-how, feel free to just skip those sections and move on ahead. No feelings will be hurt.
DEVELOPMENT
Every film starts with an idea. My idea came suddenly while sitting around my apartment on the day before concepts were due in Story class. You never know when ideas will hit; waiting until the day before the story concepts were due wasn't procrastination. Rather, I just hadn't had an inspired idea hit me in time, and as a result I had to force myself to come up with an idea to meet a deadline - something I am not entirely fond of. Idea after idea rolled off my pen and onto my paper and they all just felt forced, I can't really explain it any other way. They weren't right. Finally I looked over at my TV and the mess of plugs around it and wondered how I ever got anything plugged in. BING! Idea. This was a natural idea that popped up on its own accord - by accident - as opposed to me racking my brain looking for something. That being said, right away I already knew it was a better idea. Who's going to write the better paper, the student who has to write an essay for school or the author who writes whatever he or she wants? My point is that I believe that working and building upon inspired ideas will always lead to a better end than trying to build upon those that are uninspired. Moreover, the idea is absolutely crucial. It is your cornerstone, and although the building may change throughout construction, the cornerstone must remain as a firm foundation.
After we (my class) submitted our concepts to class and received feedback from our professor, we were instructed to expand the concept into a fully fledged story treatment. A treatment is essentially a deeper investigation into the idea. A treatment serves to hammer out the actual story beats and develop a specific plot on top of the general idea. You may know that in your story you want your character to travel from New York to LA, but how does your character get there? Does she take a car? A plane? A train? These are the details that have to be detailed out in the treatment. Furthermore, a treatment is a great place to explore your world, characters, and themes. As my professor put it, a treatment should effectively answer every question about your film: who, what, when, where, why, and how.
After submitting our treatments to our professor and, of course, receiving feedback, we went ahead and dove into the first drafts of our film. Unfortunately, this fell on week 7 of the semester, and if you have already read my post about weekend project 6 (which was actually on week 7), you will know that that was no easy weekend. If you haven't read that post, you can check it out here. As a result, we had a class writing party at IHop... at 2 in the morning... with all you can drink coffee... One long night later, we finally got to bed at the healthy hour of 5 in the morning, only to wake up at 8 to make it to class by 9 to submit our first drafts.
My first draft was substantially different than what my film turned out being, and for that I am immensely grateful. The wisdom of my faculty and advice of my peers went a long way in revising my script to what eventually became the final draft, which I believe was a much more powerful piece than what I originally started with. Four minutes is not a lot of time to make a film, and sometimes it is really tempting to try to tell a cohesive story within than four minutes as opposed to defining a moment. In my opinion, finding a moment and fleshing it out - for all that it's worth - can be much more powerful in four minutes than trying to create an intriguing plot. I think PIXAR does a fantastic job with this, and the PIXAR shorts were a huge inspiration to me in making "Starfishing". PIXAR shorts always tell a story, but focus completely on the characters and their emotions as opposed to their lives. OR, the films have a witty ending that leaves the audience entertained (like "Geri's Game"). In either case, the films focus on a single aspect of each character's life as opposed to following them around and learning their story.
But all that PIXAR stuff aside (man, it really is easy to go off topic when freeform writing in a blog - in fact, just yesterday... wait a minute), by the end of week 11 of the semester, my final draft was locked and I was ready to begin production! But of course, I wouldn't have been able to enter production without all the work I put into the film during preproduction... which conveniently overlapped with the development stage, making our lives much easier...
PREPRODUCTION
Aw man, did I say easier? What I meant was the opposite of that. Generally speaking, a film won't enter preproduction until the film is developed to the point that preproduction work won't be in vain. This isn't to say the script is always finalized before preproduction. In fact, most scripts are constantly revised all the way through filming! But rather, elements of the film are developed enough that the filmmakers can begin preproduction work on the film knowing that the work they do will in fact contribute to the the film as it is seen on the screen.
For the sake our F1's, the preproduction work that was required included a minor script analysis (I thought it was a major script analysis until I started my second semester), storyboards, shot designs/floor plans, and production design. What was unfortunate was that as I would complete a draft of storyboards, I would radically change the script and have to go back and do them all over again. Trying to balance all of that and yet maintain my 6-8 hour a day class schedule proved to be difficult, but I definitely got it done. The weekends were a big help.
My storyboards went through a couple of revisions before I was happy with them, and obviously I couldn't finish them until my script was complete. Once I finished my storyboards, I passed them off to my director of photography, Victoria Cragg, to design the shots based on my framing. For Victoria, this meant figuring out exactly where to place the camera, where to place the lights, and how to balance the lights to the correct colors. This phase of preproduction we call shot design... I'm not sure if there is an official name for it, but basically we just make a floor plan of what the final setup will like including all the actors, lights, and cameras from a birds eye view.
As for production design, for our F1's we were our own production designers, meaning we had to gather our own props, set dressing, and wardrobe. I had plenty of time to do that, because although my script radically changed from the first draft to the last, the world and the characters stayed more or less the same. As a fun fact for the costumes, for the holes and wear and tear on Red's pants, my Dad took a blowtorch to them. I was skeptical at first but it turned out great! Moral of the story: you never know when a good blow torch may come in handy while filmmaking.
My final piece of the preproduction puzzle was the script analysis. Before shooting, I made sure to meet with both of my actors and go through a rehearsal process. This is where I identified the beats of the story with my actors and went through their motivations and objectives with them. It was an extremely helpful process that proved to be incredibly valuable when we got to set, and even more valuable in the cutting room when editing the film. After we read through the script several times and decided on story beats, we blocked out the scene so that when we got to the set we would have a good idea of exactly where each character needed to be and how we would accomplish each shot.
• • •
In my next blog post I will go into production and post production. Then, hopefully I'll have a third post where I go into miscellaneous aspects of the film, like what it meant to me and why I told the story I told. The title of my blog mixes the words cinema and philosophy, and so far I've had a lot of the cine- and very little of the -losophy. I definitely hope to be able to touch mere on the latter soon. And I know I warned about the potential of some highly technical paragraphs, but for the most part it looks like I stayed away from those this time around :) Although beware, the technical will most definitely return in the next post when I tackle post production, so stay tuned for that.
And I know I said this last post but I just want to emphasize it again - for the few that read my blog, thank you so much. It really means a lot more than you might think.
At long last! I have gotten around to posting my seventh and final weekend project. I love posting these weekend projects and sharing them with you guys - however small an audience you may be - however, I must confess, I have been really eager to finish posting these weekend projects so I could start posting some of the really cool stuff we have been up to here at FSU film. I wanted to post these weekend projects before anything else, so that chronologically in the archive they would be my earliest posts. They are the first things we did at film school, an honestly they don't compare in quality to anything else we do here, so I want them to almost hide deep in the archive, where they shan't ever be found…
Okay so I'm partly kidding. I take pride in all of my work, and would show any of these weekend projects to anyone on any day, buy I am absolutely stoked to be done posting them and get to move on to some of the much more awesome work I have been up to. So with that being said, let's get on with this post.
This project was all about using offscreen sounds to propel a story forward. I decided to take on the additional challenge of mixing the entire project within my NLE, Adobe Premiere Pro, instead of bouncing it into an audio DAW like Adobe Audition. I must say, Premiere was much more capable with the audio than I think most people give it credit for, although it is still no Pro Tools or Logic. So without further ado, here is the project!
We downloaded all of our sounds from Creative Commons websites, which means that they are free to use as long as we credit the original artist. As a quick breakdown into my workflow, I first mixed whatever in camera sound I wanted to keep, which was mostly a little bit of ambient noise and Victoria's grunt when he hits the ground. I made sure it all flowed together smoothly without any cracks or pops and then sent it all into a bus. Then I started layering on my sound FX that I downloaded from the creative commons sites and positioning them in the right places. Then I adjusted the volumes of everything, routed all my sends and returns, keyframed the overall track volumes of the bus tracks, normalized everything to -3db, and viola. A short film mixed in Premiere.
As much as I learned about the mixing capabilities of Premiere in this project and also about the importance of sound as an element in our stories, I learned a lot more through the very nature of this project. From the moment my second weekend project got slammed by my Professor until the end of the weekend project cycle, I looked at each one as a learning experience and tried to learn as much as I possibly could from each one. I didn't care about the quality of the finished product nearly as much as I cared about the elements that we were learning in each video. But through all of that, I lost sight of one of the most important pieces of filmmaking: HAVING FUN. Taking the mindset I had, I went in to each weekend project viewing it more like a homework assignment than an opportunity to make a movie. At my school, my homework isn't calculus or European history; my homework is MAKING MOVIES. How cool is that?? For this project, my entire crew just threw their arms up and basically said "screw it, let's have fun" and instead of meticulously planning everything out and being very picky, we all had so much fun. We made this project up as we went along, as opposed to the other projects which were storyboarded out cut by but. We came up with ideas spontaneously on set that were awesome, even though some of them didn't work out. We saw a train track and decided to film on it, which might be illegal, but I wasn't really sure so we just went for it. This project was so much fun, and one of those moments that I realized that if you don't put your heart and soul into what you are doing, you won't ever be successful or more importantly, create good art. Filmmaking is a balance between the technical and the creative, and I have discovered that both sides flourish the most when passion is put into them. When you're truly passionate about what you're doing, you're going to have fun doing it, and that's a fact.
This was far and away the most intense weekend project we had. The assignment was to recreate a scene from one of your favorite movies, focusing on matching the production and shot design. The catch was that you were not allowed to let any of your actors see the scene before hand, and you had to try verbally directing them until they could match the performances in the actual scene. For my project, I chose a scene from "Inception". As a result of having to recreate a scene, each project came out to anywhere between 2 and 4 minutes as opposed to just 1, which made the overall shooting across the projects take about 3x longer than usual. To top it off, our scripts for our upcoming F1's (first student films) were due on the following Monday. This was my first truly sleepless weekend in film school; throughout the entire weekend I probably only managed to catch about 4-5 hours of sleep. The class as a whole was freaking out over not having enough talent to act in each of these movie scenes, and everyone's schedules got all thrown out of whack. As a result, we essentially broke out of our groups and basically took any help from whatever group we cold find. Some of us (myself included) even began begging upperclassmen to come help us out. Although it was a truly hectic weekend, it turned out to be loads of fun, and I am really proud of how this weekend project turned out especially since it had an extremely fast turn around time.
That being said, check it out!
To create this project, I took a very systematic approach. I'll break down my step-by-step process below.
Shot-Design
The first thing I noticed about the clip I chose (I would post a link to it but I couldn't find it anywhere online) is how many slow dolly creeps there were. Christopher Nolan loves those, so I immediately took note of which shots were moving and which direction they were. Next, I watched the scene about a thousand times over, pausing on each individual shot and taking a picture of the frame. I kept doing this until I was able to construct a model of what the scene looks like and the relative camera placements of each angle. This was extremely important, because the room we had to film in was way too small to actually set up my actors in the correct positions. Instead, I threw them all around the room and gave the illusion of setup through controlling their eye-lines (the directions characters look). This is called cheating the space, which was crucially important in this project. After this was all done, I laid all my photos out in storyboard form and made multiple copies of my model to show my camera crew (aka one person, a very gracious upperclassman named Ryan), my actors, and just extras so I wouldn't lose it. Here is what my model (aka floor plan) looked like:
As you can see, through watching the scene over and over again and storyboarding it out, I was able to identify 7 separate camera placements (not including the insert shots). I also made note, which is not evident on the floor plan, of which angles had a dolly move and which direction it moved. Once I had all of this figured it out, it was easy to direct my actors and make sure they were always looking and speaking in the right direction, even though in reality they might have been staring at a window of a blank wall. This freed me up to move onto Production Design.
Production Design
I really had a lot of fun trying to make this room look like a scene from Inception. There were obviously some things I just didn't have, like hi-tech lab equipment for instance. But I put a lot of work into making the room look like a warehouse like setting like it does in the movie. Something that was particularly fun was making all of the old aged newspaper to pin up against the windows like in the film. This process actually took about 2 hours, and I had a ton of help from my awesome classmate Elangie. She silently helped the whole time, and made some awesome PD decisions that ended up making my film look better. Setting up the room took about 3 hours total, and then it took another hour or so to put back. This was by far the most time and effort I had put in to the set of any weekend project we made.
I also made sure that each character's wardrobe matched the character in the movie. It's not perfect, but I did what I could.
Production
Production was interesting. I had put so much time and effort into my production design that I expected shooting to be an intense process, especially considering several of my actors, including myself, were due to go work on other weekend projects later that same day. But instead, it was insanely chill. I guess all the preparation made it really easy. Everyone showed up, got in their places, we filmed two or three takes of each angle, and then we were done. Just like that. The only thing that took some time was lighting. The whole scene in Inception is interesting, because even though the color palette in the costume and set design is warm, the scene has an overall cool temperature. To keep everything cool, I white balanced my camera to tungsten light and then let the sunlight from the windows shine right in. Sunlight is a very blue light, and balancing my camera to a warmer color balance made the sunlight appear even bluer. However, because none of my actors were being directly lit by the sunlight, I was able to use the tungsten lights as their key lights. The orange tungsten lights now appeared white because of the white balance I applied to the camera, so each one of my actors was lit nice and evenly by the tungsten light, keeping their natural flesh tones in tact, with very cool backlighting on the whole scene. I'm actually quite impressed with how all the light and color came out considering I hadn't really drawn a light plan and we figured it out on the fly based on the storyboard photos. One element that really suffered in production though was my sound. With all the groups being mixed up this week, I had no one to operate a boom, so instead we just stuck a shotgun mic on the camera and let it roll. This would be unacceptable in a real film production, but for a weekend project it was all I could do. The huge reverb-y room did not play well with a shotgun mic that was 20 feet away from who was speaking.. I'll just leave it at that.
Post-Production
For other weekend projects, I was more concerned on the content of the assignment that I was with the actual quality of the piece. But after how much work I had put into this project, I decided to go ahead and color grade the whole thing. I used Adobe SpeedGrade and was quite impressed by it's temperature slider, easily able to match the color temperatures of each shot. Then just for the heck of it I messed around with some of the preset LUT's and actually found one I really liked, so I used an LUT designed for ARRI Alexa footage that really brought out the blues in the scene. Then in a new grade layer I just started tweaking the footage with masks until I got something I was happy with. As much as I liked SpeedGrade though, I find its interface overwhelmingly clunky, as opposed to Da Vinci Resolve which just feels natural. Unless Speedgrade can give me a definitive reason as to why it is better than Resolve, I'm going to stick with Resolve.
I know that I'm way behind schedule on this blog, but now that semester break is here I'll be trying to catch up as much as possible, so I'll probably put weekend projects 4-7 on here almost back to back to back to back!
This project was a lot of fun to shoot. Just a simple chase scene, but that gives you such much freedom as a director to just have fun with it. So here is my project "The Pursuit"!
In this project I really wanted to focus on foreground objects. Placing elements in the foreground in front of your actors in the midground can really add so much depth to the frame. In a chase scene, it also adds a lot of opportunities to hide your cuts and have some really great transitions from shot to shot. In this video I would cut on cars a lot, giving the illusion that if the girl ran behind the car the guy came out the other side. Curiously, our minds understand that there was a cut made there and that there was no teleportation magic, even though the cut is hidden. I'm not really sure why that works but it does, and it is a great tool to keep in your arsenal as a director.
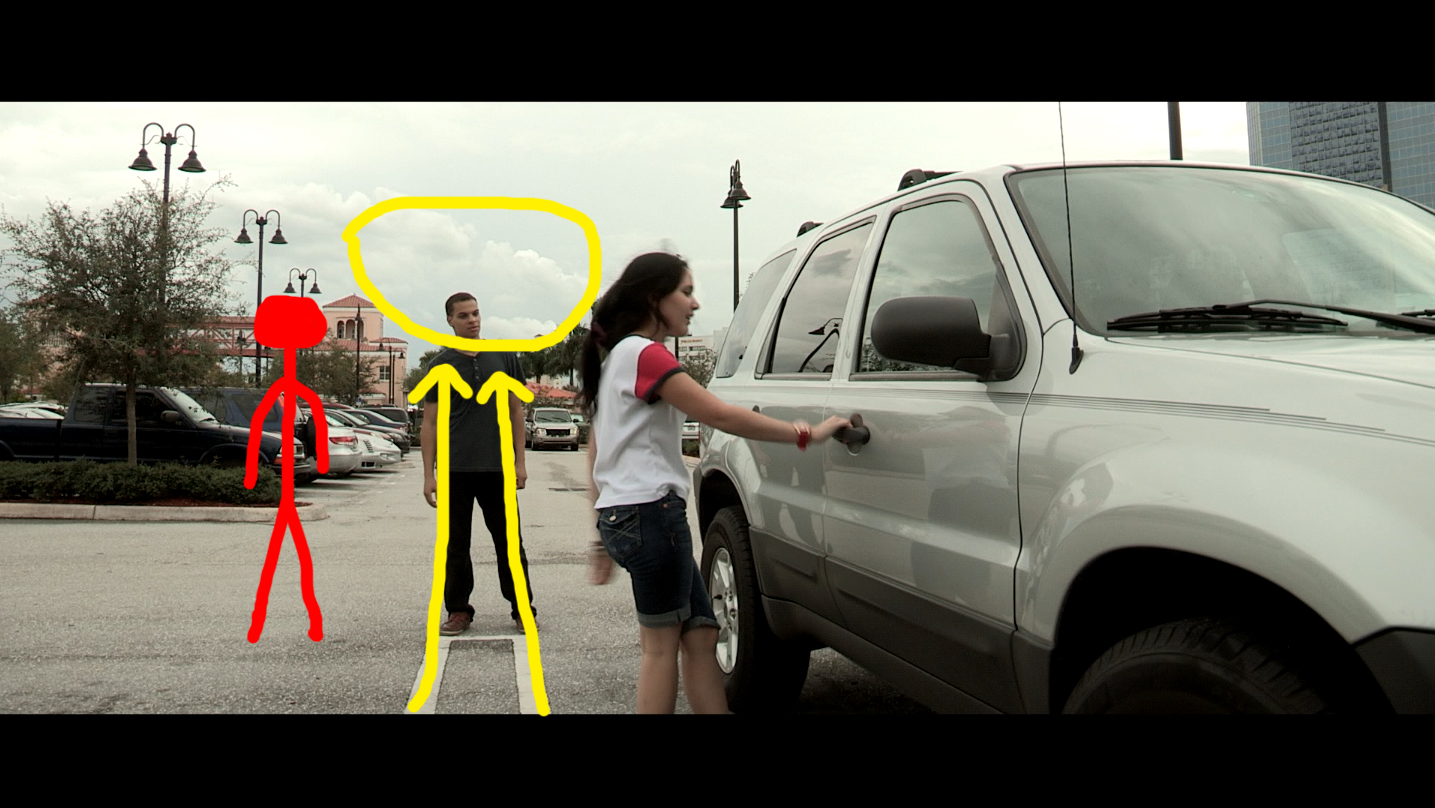
Also, my last shot is a shot where I went against my gut and did what my instructor and I had talked about after my third weekend project. If you flip back to my post on weekend project 3, you'll see that I talk a lot about a shot where I could have framed my actress in a clear patch of sky, but instead I placed her right in front of a tree. On my last shot in this project, my gut told me to have a good amount of spacing between my two actors. But when I did that, I lost the detail of my actor's face in trees, skin-tone buildings, and light posts. I decided to squeeze my two characters closer together, against my initial desire, and the result was great! Take a look at the screenshot below:
The red stick figure represents where I wanted to frame the actor. Look at how cluttered that area of the frame is. Instead, I have this nice patch of sky which, as luck would have it, neatly vignette's his head with a nice circular arch. In addition, the lines from the parking space lead straight up to that circle on either side of his head, giving us vertical framing lines in addition to the vignette frame. I think this shot turned out awesome and I am really glad that I was able to use what I learned from my last weekend project to make this one better.
CONTINUITY
When I screened this project to some classmates and my parents, a common criticism I received was that the distance between the two runners was always chaining, and they could never gauge whether or not the pursuer was catching up or not. To be honest, this is something I totally neglected on set. It is so easy to get caught up in each individual frame and lose sight of the picture as a whole. This is just something for all of us to keep in mind of in the future. Continuity is extremely important.
SOUND
On this project I decided to give Adobe Audition a go for the first time. I had used it briefly before but had never tried mixing in it. Being familiar with Garage Band and also live sound mixing (I used to run boards for my church in the past) was a huge help coming into Audition. I learned a lot about sub mixing through bus tracks and limiting/normalizing audio to proper peaks. I still have a lot to learn, and I have been watching some Lynda tutorials on the proper ways to mix film in any standard DAW, and trust me it is no easy task. Hopefully I'll be able to write and in depth blog on it in the future.
As for the music, I recorded the guitar parts straight into audition in a new multitrack session. I made the string tracks and percussion tracks in Garage Band using the Main Stage jam packs, then bounced those back into audition to do some mixing. I find that the limited mixing tools in Audition are superior to the many in Garage Band. Compression and Reverb applied in Audition helps the drum tracks bounce right back into the real world, not sounding like MIDI anymore, as opposed to compression and reverb in Garage Band which leave things sounding digitized. Then I bounced that multitrack session to a new file and brought it back into my regular sound mix which included my dialogue and sound effects. Then viola - a finished mix.
After mixing this project in Audition, I was quite impressed with its capabilities, especially considering it is a DAW no one ever talks about. The only DAWs anyone ever seems to mention are Pro Tools, Logic, Ableton, and Reason. I hear some talk of Cubase too and I know some kids with copies of FL Studios, but in all honesty it seems like the Pro Tools is king. That being said Audition was a far superior mixing tool to Premiere and Garage Band, so I am curious to see what any pros think of it, though I am hard pressed to really find any reviews online. I encourage all of you to give Audition a try!
Again, for my few readers out there sorry I've been gone so long. Three more weekend projects to post and then I can start getting into the good stuff!
This project was an interesting one. I also personally consider it the turning point for me when I fully grasped and realized that this is film school - I'm here to learn to make movies not to make movies. I'll get more into that later. For now, let me explain the prompt so you can watch my video. This one had a lot to cover so I'm just going to copy and paste it straight off my assignment sheet:
Assignment Description:
Sometimes there are unexpected outcomes when more than one person has the
same desire.
When your project is screened in class, you will need to explain and defend
your filmmaking choices.
Learning Objectives:
The goal of this exercise is to explore screen action and time through movement,
continuity, and screen direction.
Assignment Specs and Guidelines:
The completed exercise must not exceed 60 seconds in length.
Design a visual progression to enhance the beats of a scene.
Orient the viewer to the spatial geography of the scene by using:
o The180° line o Screen-direction o Eyelines
Using the 180° line to create subjective or objective shots.
I think the section titled learning objectives is a little misleading. Yes, all the "specs and guidelines" contribute to things like motion and continuity, but our instructor made it clear to us that our focus was to be on eyelines, the 180° line, and screen-direction (entrances and exits).
Oh, and there's one last thing: to ensure that we thought deeply about all of these things in each and every shot, we had to film the whole project IN REVERSE.
(Disclaimer: I had the cool idea that my characters would step through a portal and into this "reverse" land, and my teacher ok'd that idea, so my first couple shots are not in reverse.)
Without further ado, my third weekend project:
Coming into this project I had a completely different mindset then I did in the other two. I wasn't concerned with how my project looked or how well it was received by my classmates in the screenings, I just wanted to focus on the assignment guidelines and learning objectives and try to grasp a better understanding of them. A major factor that contributed to this shift in mindset was my professor not allowing me to add the audio I wanted to my second weekend project. I realized that if I didn't care about impressing anybody or making the best video with the greatest storyline, I could really hone in and focus intensely on the specific task that each weekend project wanted us to focus on. That being said, when we got to my locations to shoot it was really dark from the shadows so I just opened up my exposure to an unhealthy extreme and didn't care that I lost the sky: understanding eyelines and how they interact with the 180°-line has nothing to do with how bright the sky is, but it has everything to do with an actor's eyes. How could I focus on eyelines if you couldn't see eyes? I didn't add in any dramatic music tracks and filming in reverse basically took away the right to use dialogue. I also challenged myself to cross the 180°-line as many times as possible within the one minute without breaking it. So there are some camera moves and cuts that don't really make sense or add to the video, but I'm okay with that because in doing so I learned a lot about the 180°-line that I can utilize in serious projects like my F1 later down the road. Before I can really get into the specifics of what I learned about the 180°-line though, I think it would be helpful to explain what exactly the 180°-line is and just how it works and why it is important.
I couldn't find the video we watched in school to explain the 180°-line, which I like better than this one, but this one is good nonetheless:
The 180° rule is an important rule to follow, but by no means is it a law. Sometimes disorienting your viewer is exactly what you want to achieve as a director. Ever seen The Dark Knight?
In this scene, director Christopher Nolan obeys, crosses, and breaks the 180°-line depending on the tone of the scene. As Commissioner Gordon speaks to the Joker, the 180°-line is respected. The camera is positioned to always keep the Joker camera left of Commissioner Gordon. When Gordon leaves the room and Batman takes over, the 180°-line is broken but then still respected and observed after the break - using the actual break of the rule as the reestablishing of the line. Now, the Joker is always camera right of Batman. However, as their conversation unfolds and we realize just how devious the Joker has been, the camera slowly starts tracking until the 180°-line is crossed in camera, reestablishing the shot. The moment this line is reestablished is the moment we realize the Joker is actually in control, and now the Joker stays camera left of Batman. However, once Batman gets violent and starts throwing the Joker around, any observation of the 180°-line is thrown out the window and the camera is going everywhere. Disrespecting the rule combined with an increasing pace in the cutting and a build in the dramatic music results in the overall tension that we as audience feel by the end of the scene.
(As a side note, Nolan also introduces dutch camera angles towards the end of the sequence, which is worth noting because I tried my hand at a dutch angle in this weekend project as well. A dutch camera angle is achieved by tilted the camera so that any horizontal and vertical lines in the shot become diagonal. For some reason, horizontal lines psychologically convey peace to humans. In contrast, diagonal lines psychologically convey action and disorder. These dutch angles only add to the sense of chaos that Nolan slowly creates in the interrogation scene.)
While breaking the 180° rule can achieve some outstanding dramatic effects as seen above, the rule in general should not be broken. For the sake of this weekend project we were strictly forbidden to break it. Our professor's really wanted us to gain a good understanding of the 180°-line because obeying it really can add a lot to your films. In addition, before you can break a rule you must first fully understand it. Ironically, the sequence in The Dark Knight that breaks the 180° rule the most is probably the sequence where the 180° rule was most on Christopher Nolan's mind.
All this being said, let's analyze the use of the 180°-line in my own weekend project.
Analysis
As I mentioned before, I intentionally tried to cross the 180-line in this project several times. I felt like intentionally trying to cross the line without breaking it would be a great way to try to learn it. In the end I was right, but not because I succeeded but rather because I failed. My professor sat down one-on-one with me for about half an hour and we fleshed out all the places I did a good job following the 180° rule and all the places I broke them and why I broke them. One reason I am not a huge fan of the vimeo video I linked above that explains the 180°-line is that it makes it sound so simple. It's not. What makes the 180° rule so interesting is that it is designed to help an audience better understand the 3D space in a scene, yet all scenes are actually 2D images being projected on a screen. That being said you can break the 180° rule through unconventional 2D methods. Let's get into it.
My first break of the 180°-rule comes - you guessed it - in my very first cut of the film. Yup. I couldn't believe it either and I really argued with my professor on this one. But in the end he was right and I was wrong - shocker. Let's take a look.
So here are my first two shots. If you look in the first shot, the girl in the red shirt (Grace) is camera right and the girl in the black tank (Victoria) is camera left. In the second shot, their respective camera positions are reversed. However, this is NOT in violation of the 180° rule. The fact that they have switched sides of the screen is perfectly acceptable because the 180°-line, as defined by their eyelines, is not between each other but between them and the portal. Let's take a look.
From the first shot to the second shot, I moved the camera all the way up to the line, hugging it as tight as I could without crossing it. However, my professor insisted that I did cross it. The reasoning he gave is that in this first shot, Grace looks closer to the camera than Victoria. Now this might actually be true. In some takes we did have Grace closer to the camera before we opted to switch it, and I don't remember which take was which, but regardless of what was reality, in the 2D frame Grace looks closer. Why? There are several reasons. First and foremost is object size. Let's really zoom in on our girls and see who occupies the most vertical space.
Grace definitely appears taller than Victoria, indicating that she is closer to the camera. If you look at their feet, Grace's feet seem to be higher in vertical space than Victoria's, indicating that she would actually be farther away, but since her feet are obscured in grass it becomes hard to tell for sure. In addition, the audience's eyes are immediately drawn to a character's eyes. Keeping in mind Grace's obscured feet and the fact that an audience member's gaze will be automatically drawn to where her eyes are, it becomes clear that the apparent vertical space in this shot is defined by the red and blue lines I drew above. So Grave actually is bigger in the frame. Secondly after object size comes color separation. It is a natural phenomena that objects that are warm colors (red, orange, yellow) will always appear closer to us than objects that are cool colors (blue, green); this is even true for real life outside the screen world. Victoria is dominated by blue and black while Grace is dominated by red. This color separation also serves to push Grace closer to the camera than Victoria.
So based upon my first shot, we as viewers are left to believe that we are looking at a set up like follows:
Yet when we switch to my second camera angle, Grace is clearly camera left of Victoria, which would indicate that she was in fact farther away from the camera than Victoria was in my first shot. This leaves us with two explanations for what happened: either Grace can teleport or the camera crossed the line. Since we know that in this particular scene no teleporting took place, we are left to assume that the camera crossed the line. If the camera did cross the line, it makes sense that Grace would appear camera left of Victoria, because all screen directions get reversed when the line is crossed.
So that is how I crossed the line in the very first two shots of film. Did I actually cross the line on set? I'm not sure. I'm inclined to believe that on set I did not cross the line but accidentally used one of the takes where Grace was closer to the camera as my first shot. What really happened? I'll never know - but the fact remains that a video is shown on a 2D screen, and regardless if 3D me actually crossed the 3D line with my 3D camera while physically on a 3D set, it appeared that I crossed the line on the 2D plane that is the screen.
Now remember, crossing the line is NOT breaking the 180° rule - SO LONG as you physically show the line getting crossed in camera, something I did not do between my first two shots. However, I successfully crossed the line without breaking the rule in this next shot of my project:
In this shot both girls are staring at the box of DVD's on the balcony. However, as that object is not in the shot, the only line they have to draw is a line between the two girls. Grace is camera right and Victoria is camera left. We can see that our 180°-line starts likes this:
However, with a physical camera move across the line, I cross the line without breaking the 180° rule. With that camera move across the line, I reestablish the line so that Victoria is camera right and Grace is camera left. That reestablished line looks like this:
With the line successfully reestablished, my next shot of the girls makes sense to the viewers:
As you can see, Victoria stays camera right and Grace stays camera left. In this shot I successfully crossed the line without breaking it.
I did however take this concept too far and did break the rule one more time. Let's take a look at that.
In the first frame of this shot, Victoria starts camera right, as she should because of the most recent line I had established. I then track the camera slowly to the right, sending Victoria camera left and introducing Grace on camera right. In my mind I had just successfully reestablished the line, but my professor informed me that I was quite wrong. The thing about the line is that you have to think of it in 3D space. When I filmed this project, I almost imagined the 180°-line as a vertical line running straight down the frame and if a character was ever going to switch sides of that line I had to show it in camera. THAT'S WRONG. The 180°-line has nothing to do with which side of the frame a subject is on, but whether that subject is camera right or camera left of an opposing subject. My professor explained to me that if I had wanted to cross the line in this shot, I would have had to start the shot with Grace visibly camera left of Victoria, and then tracked the camera so that the relative movement between them sent Grace camera right Victoria. So in this shot I again broke the 180° rule because Victoria stays camera left of Grace the entire shot, as opposed to starting the shot camera right of her like she should have (even though she starts the shot on camera right... see how the 180°-line can start to get confusing?).
For the rest of the project I successfully stayed on one side of the line, but I'm glad I failed where I did because I learned so much from it. One thing you might have picked up throughout reading all of that is the amount of two-dimensional phrases I had to use to describe everything, like camera left or camera right among others. The fact is that film is two-dimensional medium, and everything you see on screen is in fact 2D. You cannot discuss the 180°-line without also discussing the 2D nature of film. But bringing up the 2D nature of the frame brings up one more issue with this project that I'd like to talk about.
2D Space
There is one shot in particular that I really got a lot of flak for. It was this shot right here:
Personally I really liked this shot. I thought it was framed really nicely. My professor thought it had a lot of potential, especially on the first frame which looks like this:
But once Grace walked in my professor turned to me and said "Dude... there's a tree growing out of her head." That kind of caught me off guard. Obviously the tree was behind her! But my professor reiterated to me that film was viewed on a 2D screen, and that tree was the exact same distance away from the audience as Grace was. He said we should try to frame our actors by utilizing the differences in color and contrast around them. He thinks the shot would have looked much much nicer If Grace had walked just a few feet forward and come a little bit closer to Victoria, so that her head would be nicely framed in that perfect little patch of sky. He then suggested that on a real film once I had positioned her that way I should have taken some hedge clippers and clipped away all those dead branches on the left of the frame so that they wouldn't interfere with the spot of sky Grace was going to be framed in. But I argued. I told him that if I would have positioned her like that, the distance between her and Victoria would have changed from shot to shot. "So?" he said. "This is film. No one will know - cheat the space!" We went on about cheating the space for a while. At first I had negative reactions to the idea, but he showed me example after example of how Hollywood filmmakers cheat space all the time and finally I realized he was right - no one would notice. It's a 2D frame, and the audience won't know what they can't see or perceive. That will always hold true, no matter what. Even in 3D films where you put on the glasses, the audience will not know what they can't see or perceive.
Reflection
Overall I learned a ton in this project, and I think the amount I wrote can speak for that. But to recap, I really learned a lot about the 180°-line and the rules surrounding it. I also learned about the importance of framing actor's or areas of primary interest in the shot. Finally, I learned about cheating space.
But the most important thing? I learned these things through my failures, not my successes, and I realized that that was what film school was for.