I know that I'm way behind schedule on this blog, but now that semester break is here I'll be trying to catch up as much as possible, so I'll probably put weekend projects 4-7 on here almost back to back to back to back!
This project was a lot of fun to shoot. Just a simple chase scene, but that gives you such much freedom as a director to just have fun with it. So here is my project "The Pursuit"!
In this project I really wanted to focus on foreground objects. Placing elements in the foreground in front of your actors in the midground can really add so much depth to the frame. In a chase scene, it also adds a lot of opportunities to hide your cuts and have some really great transitions from shot to shot. In this video I would cut on cars a lot, giving the illusion that if the girl ran behind the car the guy came out the other side. Curiously, our minds understand that there was a cut made there and that there was no teleportation magic, even though the cut is hidden. I'm not really sure why that works but it does, and it is a great tool to keep in your arsenal as a director.
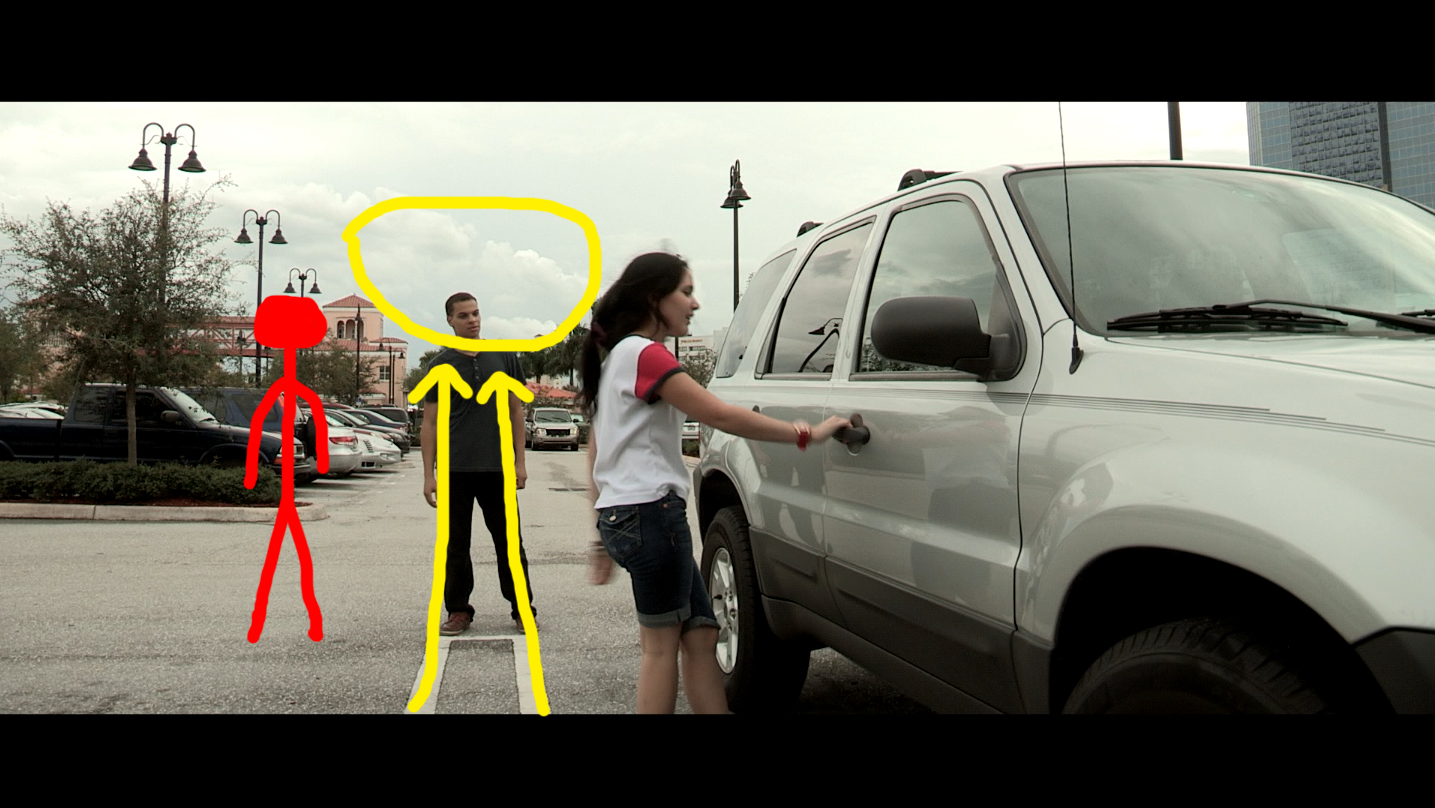
Also, my last shot is a shot where I went against my gut and did what my instructor and I had talked about after my third weekend project. If you flip back to my post on weekend project 3, you'll see that I talk a lot about a shot where I could have framed my actress in a clear patch of sky, but instead I placed her right in front of a tree. On my last shot in this project, my gut told me to have a good amount of spacing between my two actors. But when I did that, I lost the detail of my actor's face in trees, skin-tone buildings, and light posts. I decided to squeeze my two characters closer together, against my initial desire, and the result was great! Take a look at the screenshot below:
The red stick figure represents where I wanted to frame the actor. Look at how cluttered that area of the frame is. Instead, I have this nice patch of sky which, as luck would have it, neatly vignette's his head with a nice circular arch. In addition, the lines from the parking space lead straight up to that circle on either side of his head, giving us vertical framing lines in addition to the vignette frame. I think this shot turned out awesome and I am really glad that I was able to use what I learned from my last weekend project to make this one better.
CONTINUITY
When I screened this project to some classmates and my parents, a common criticism I received was that the distance between the two runners was always chaining, and they could never gauge whether or not the pursuer was catching up or not. To be honest, this is something I totally neglected on set. It is so easy to get caught up in each individual frame and lose sight of the picture as a whole. This is just something for all of us to keep in mind of in the future. Continuity is extremely important.
SOUND
On this project I decided to give Adobe Audition a go for the first time. I had used it briefly before but had never tried mixing in it. Being familiar with Garage Band and also live sound mixing (I used to run boards for my church in the past) was a huge help coming into Audition. I learned a lot about sub mixing through bus tracks and limiting/normalizing audio to proper peaks. I still have a lot to learn, and I have been watching some Lynda tutorials on the proper ways to mix film in any standard DAW, and trust me it is no easy task. Hopefully I'll be able to write and in depth blog on it in the future.
As for the music, I recorded the guitar parts straight into audition in a new multitrack session. I made the string tracks and percussion tracks in Garage Band using the Main Stage jam packs, then bounced those back into audition to do some mixing. I find that the limited mixing tools in Audition are superior to the many in Garage Band. Compression and Reverb applied in Audition helps the drum tracks bounce right back into the real world, not sounding like MIDI anymore, as opposed to compression and reverb in Garage Band which leave things sounding digitized. Then I bounced that multitrack session to a new file and brought it back into my regular sound mix which included my dialogue and sound effects. Then viola - a finished mix.
After mixing this project in Audition, I was quite impressed with its capabilities, especially considering it is a DAW no one ever talks about. The only DAWs anyone ever seems to mention are Pro Tools, Logic, Ableton, and Reason. I hear some talk of Cubase too and I know some kids with copies of FL Studios, but in all honesty it seems like the Pro Tools is king. That being said Audition was a far superior mixing tool to Premiere and Garage Band, so I am curious to see what any pros think of it, though I am hard pressed to really find any reviews online. I encourage all of you to give Audition a try!
Again, for my few readers out there sorry I've been gone so long. Three more weekend projects to post and then I can start getting into the good stuff!
This project was an interesting one. I also personally consider it the turning point for me when I fully grasped and realized that this is film school - I'm here to learn to make movies not to make movies. I'll get more into that later. For now, let me explain the prompt so you can watch my video. This one had a lot to cover so I'm just going to copy and paste it straight off my assignment sheet:
Assignment Description:
Sometimes there are unexpected outcomes when more than one person has the
same desire.
When your project is screened in class, you will need to explain and defend
your filmmaking choices.
Learning Objectives:
The goal of this exercise is to explore screen action and time through movement,
continuity, and screen direction.
Assignment Specs and Guidelines:
The completed exercise must not exceed 60 seconds in length.
Design a visual progression to enhance the beats of a scene.
Orient the viewer to the spatial geography of the scene by using:
o The180° line o Screen-direction o Eyelines
Using the 180° line to create subjective or objective shots.
I think the section titled learning objectives is a little misleading. Yes, all the "specs and guidelines" contribute to things like motion and continuity, but our instructor made it clear to us that our focus was to be on eyelines, the 180° line, and screen-direction (entrances and exits).
Oh, and there's one last thing: to ensure that we thought deeply about all of these things in each and every shot, we had to film the whole project IN REVERSE.
(Disclaimer: I had the cool idea that my characters would step through a portal and into this "reverse" land, and my teacher ok'd that idea, so my first couple shots are not in reverse.)
Without further ado, my third weekend project:
Coming into this project I had a completely different mindset then I did in the other two. I wasn't concerned with how my project looked or how well it was received by my classmates in the screenings, I just wanted to focus on the assignment guidelines and learning objectives and try to grasp a better understanding of them. A major factor that contributed to this shift in mindset was my professor not allowing me to add the audio I wanted to my second weekend project. I realized that if I didn't care about impressing anybody or making the best video with the greatest storyline, I could really hone in and focus intensely on the specific task that each weekend project wanted us to focus on. That being said, when we got to my locations to shoot it was really dark from the shadows so I just opened up my exposure to an unhealthy extreme and didn't care that I lost the sky: understanding eyelines and how they interact with the 180°-line has nothing to do with how bright the sky is, but it has everything to do with an actor's eyes. How could I focus on eyelines if you couldn't see eyes? I didn't add in any dramatic music tracks and filming in reverse basically took away the right to use dialogue. I also challenged myself to cross the 180°-line as many times as possible within the one minute without breaking it. So there are some camera moves and cuts that don't really make sense or add to the video, but I'm okay with that because in doing so I learned a lot about the 180°-line that I can utilize in serious projects like my F1 later down the road. Before I can really get into the specifics of what I learned about the 180°-line though, I think it would be helpful to explain what exactly the 180°-line is and just how it works and why it is important.
I couldn't find the video we watched in school to explain the 180°-line, which I like better than this one, but this one is good nonetheless:
The 180° rule is an important rule to follow, but by no means is it a law. Sometimes disorienting your viewer is exactly what you want to achieve as a director. Ever seen The Dark Knight?
In this scene, director Christopher Nolan obeys, crosses, and breaks the 180°-line depending on the tone of the scene. As Commissioner Gordon speaks to the Joker, the 180°-line is respected. The camera is positioned to always keep the Joker camera left of Commissioner Gordon. When Gordon leaves the room and Batman takes over, the 180°-line is broken but then still respected and observed after the break - using the actual break of the rule as the reestablishing of the line. Now, the Joker is always camera right of Batman. However, as their conversation unfolds and we realize just how devious the Joker has been, the camera slowly starts tracking until the 180°-line is crossed in camera, reestablishing the shot. The moment this line is reestablished is the moment we realize the Joker is actually in control, and now the Joker stays camera left of Batman. However, once Batman gets violent and starts throwing the Joker around, any observation of the 180°-line is thrown out the window and the camera is going everywhere. Disrespecting the rule combined with an increasing pace in the cutting and a build in the dramatic music results in the overall tension that we as audience feel by the end of the scene.
(As a side note, Nolan also introduces dutch camera angles towards the end of the sequence, which is worth noting because I tried my hand at a dutch angle in this weekend project as well. A dutch camera angle is achieved by tilted the camera so that any horizontal and vertical lines in the shot become diagonal. For some reason, horizontal lines psychologically convey peace to humans. In contrast, diagonal lines psychologically convey action and disorder. These dutch angles only add to the sense of chaos that Nolan slowly creates in the interrogation scene.)
While breaking the 180° rule can achieve some outstanding dramatic effects as seen above, the rule in general should not be broken. For the sake of this weekend project we were strictly forbidden to break it. Our professor's really wanted us to gain a good understanding of the 180°-line because obeying it really can add a lot to your films. In addition, before you can break a rule you must first fully understand it. Ironically, the sequence in The Dark Knight that breaks the 180° rule the most is probably the sequence where the 180° rule was most on Christopher Nolan's mind.
All this being said, let's analyze the use of the 180°-line in my own weekend project.
Analysis
As I mentioned before, I intentionally tried to cross the 180-line in this project several times. I felt like intentionally trying to cross the line without breaking it would be a great way to try to learn it. In the end I was right, but not because I succeeded but rather because I failed. My professor sat down one-on-one with me for about half an hour and we fleshed out all the places I did a good job following the 180° rule and all the places I broke them and why I broke them. One reason I am not a huge fan of the vimeo video I linked above that explains the 180°-line is that it makes it sound so simple. It's not. What makes the 180° rule so interesting is that it is designed to help an audience better understand the 3D space in a scene, yet all scenes are actually 2D images being projected on a screen. That being said you can break the 180° rule through unconventional 2D methods. Let's get into it.
My first break of the 180°-rule comes - you guessed it - in my very first cut of the film. Yup. I couldn't believe it either and I really argued with my professor on this one. But in the end he was right and I was wrong - shocker. Let's take a look.
So here are my first two shots. If you look in the first shot, the girl in the red shirt (Grace) is camera right and the girl in the black tank (Victoria) is camera left. In the second shot, their respective camera positions are reversed. However, this is NOT in violation of the 180° rule. The fact that they have switched sides of the screen is perfectly acceptable because the 180°-line, as defined by their eyelines, is not between each other but between them and the portal. Let's take a look.
From the first shot to the second shot, I moved the camera all the way up to the line, hugging it as tight as I could without crossing it. However, my professor insisted that I did cross it. The reasoning he gave is that in this first shot, Grace looks closer to the camera than Victoria. Now this might actually be true. In some takes we did have Grace closer to the camera before we opted to switch it, and I don't remember which take was which, but regardless of what was reality, in the 2D frame Grace looks closer. Why? There are several reasons. First and foremost is object size. Let's really zoom in on our girls and see who occupies the most vertical space.
Grace definitely appears taller than Victoria, indicating that she is closer to the camera. If you look at their feet, Grace's feet seem to be higher in vertical space than Victoria's, indicating that she would actually be farther away, but since her feet are obscured in grass it becomes hard to tell for sure. In addition, the audience's eyes are immediately drawn to a character's eyes. Keeping in mind Grace's obscured feet and the fact that an audience member's gaze will be automatically drawn to where her eyes are, it becomes clear that the apparent vertical space in this shot is defined by the red and blue lines I drew above. So Grave actually is bigger in the frame. Secondly after object size comes color separation. It is a natural phenomena that objects that are warm colors (red, orange, yellow) will always appear closer to us than objects that are cool colors (blue, green); this is even true for real life outside the screen world. Victoria is dominated by blue and black while Grace is dominated by red. This color separation also serves to push Grace closer to the camera than Victoria.
So based upon my first shot, we as viewers are left to believe that we are looking at a set up like follows:
Yet when we switch to my second camera angle, Grace is clearly camera left of Victoria, which would indicate that she was in fact farther away from the camera than Victoria was in my first shot. This leaves us with two explanations for what happened: either Grace can teleport or the camera crossed the line. Since we know that in this particular scene no teleporting took place, we are left to assume that the camera crossed the line. If the camera did cross the line, it makes sense that Grace would appear camera left of Victoria, because all screen directions get reversed when the line is crossed.
So that is how I crossed the line in the very first two shots of film. Did I actually cross the line on set? I'm not sure. I'm inclined to believe that on set I did not cross the line but accidentally used one of the takes where Grace was closer to the camera as my first shot. What really happened? I'll never know - but the fact remains that a video is shown on a 2D screen, and regardless if 3D me actually crossed the 3D line with my 3D camera while physically on a 3D set, it appeared that I crossed the line on the 2D plane that is the screen.
Now remember, crossing the line is NOT breaking the 180° rule - SO LONG as you physically show the line getting crossed in camera, something I did not do between my first two shots. However, I successfully crossed the line without breaking the rule in this next shot of my project:
In this shot both girls are staring at the box of DVD's on the balcony. However, as that object is not in the shot, the only line they have to draw is a line between the two girls. Grace is camera right and Victoria is camera left. We can see that our 180°-line starts likes this:
However, with a physical camera move across the line, I cross the line without breaking the 180° rule. With that camera move across the line, I reestablish the line so that Victoria is camera right and Grace is camera left. That reestablished line looks like this:
With the line successfully reestablished, my next shot of the girls makes sense to the viewers:
As you can see, Victoria stays camera right and Grace stays camera left. In this shot I successfully crossed the line without breaking it.
I did however take this concept too far and did break the rule one more time. Let's take a look at that.
In the first frame of this shot, Victoria starts camera right, as she should because of the most recent line I had established. I then track the camera slowly to the right, sending Victoria camera left and introducing Grace on camera right. In my mind I had just successfully reestablished the line, but my professor informed me that I was quite wrong. The thing about the line is that you have to think of it in 3D space. When I filmed this project, I almost imagined the 180°-line as a vertical line running straight down the frame and if a character was ever going to switch sides of that line I had to show it in camera. THAT'S WRONG. The 180°-line has nothing to do with which side of the frame a subject is on, but whether that subject is camera right or camera left of an opposing subject. My professor explained to me that if I had wanted to cross the line in this shot, I would have had to start the shot with Grace visibly camera left of Victoria, and then tracked the camera so that the relative movement between them sent Grace camera right Victoria. So in this shot I again broke the 180° rule because Victoria stays camera left of Grace the entire shot, as opposed to starting the shot camera right of her like she should have (even though she starts the shot on camera right... see how the 180°-line can start to get confusing?).
For the rest of the project I successfully stayed on one side of the line, but I'm glad I failed where I did because I learned so much from it. One thing you might have picked up throughout reading all of that is the amount of two-dimensional phrases I had to use to describe everything, like camera left or camera right among others. The fact is that film is two-dimensional medium, and everything you see on screen is in fact 2D. You cannot discuss the 180°-line without also discussing the 2D nature of film. But bringing up the 2D nature of the frame brings up one more issue with this project that I'd like to talk about.
2D Space
There is one shot in particular that I really got a lot of flak for. It was this shot right here:
Personally I really liked this shot. I thought it was framed really nicely. My professor thought it had a lot of potential, especially on the first frame which looks like this:
But once Grace walked in my professor turned to me and said "Dude... there's a tree growing out of her head." That kind of caught me off guard. Obviously the tree was behind her! But my professor reiterated to me that film was viewed on a 2D screen, and that tree was the exact same distance away from the audience as Grace was. He said we should try to frame our actors by utilizing the differences in color and contrast around them. He thinks the shot would have looked much much nicer If Grace had walked just a few feet forward and come a little bit closer to Victoria, so that her head would be nicely framed in that perfect little patch of sky. He then suggested that on a real film once I had positioned her that way I should have taken some hedge clippers and clipped away all those dead branches on the left of the frame so that they wouldn't interfere with the spot of sky Grace was going to be framed in. But I argued. I told him that if I would have positioned her like that, the distance between her and Victoria would have changed from shot to shot. "So?" he said. "This is film. No one will know - cheat the space!" We went on about cheating the space for a while. At first I had negative reactions to the idea, but he showed me example after example of how Hollywood filmmakers cheat space all the time and finally I realized he was right - no one would notice. It's a 2D frame, and the audience won't know what they can't see or perceive. That will always hold true, no matter what. Even in 3D films where you put on the glasses, the audience will not know what they can't see or perceive.
Reflection
Overall I learned a ton in this project, and I think the amount I wrote can speak for that. But to recap, I really learned a lot about the 180°-line and the rules surrounding it. I also learned about the importance of framing actor's or areas of primary interest in the shot. Finally, I learned about cheating space.
But the most important thing? I learned these things through my failures, not my successes, and I realized that that was what film school was for.
This weekend's project was an interesting one. Not only do I still not understand the title, but it was extremely difficult to try to pull off the prompt and keep the focus central to the video in less than one minute.
The prompt:
"A character longs for something that he or she does not currently possess. Include what is at stake for the character if he or she does not obtain the desire."
The focus of the project was:
"The goal of this exercise is to explore the externalization and motivations of character, through visual elements, and through the use of a basic 3-act structure."
As you can imagine, it is not easy to craft a story with 3-act structure in less than one minute. Here was my attempt:
The class we took prior to creating this project was actually an acting class. We talked about character objectives and super-objectives. We learned about how it is crucial as directors to communicate with our actors what their suber-objectives are; it's what drives their ultimate decision making process throughout a story. It's up to the actor to come up with a persona for the character - how that character reacts to that super-objective. Regular objectives are different than super-objectives: they are immediate objectives. In Star Wars, Luke and Obi-Wan go to Mos Eisley with the objective of finding a pilot. However, their super-objective is to find Princess Leia and deliver the droids to her. Objectives and super-objectives exist harmoniously with the three-act structure, and one cannot exist without the other. That being said, we had to try to tie that structure into one minute not through means of plot development, but through character development.
I think my three acts in this project are relatively simple. In the first act, our pool-playing gentleman is confronted with a problem. How can he hit in the 8-ball when the yellow ball sits in the way? We see that a large stack of cash it at stake for him if he fails his objective. In the second act, we learn that our character's super-objective isn't actually the money, but rather a woman. For some reason, this pool game and that cash is essential for his life with her. (More on this later.) In the third act he finally decides to take action and changes the angle of his shot before taking it. Whether or not he makes it we will never know; I cut it short because it is not necessary to know if he makes it or not for the heart of the story to be told.
Whether or not I was successful in conveying these three acts is for you to decide. I made the film, so I know them. But if I couldn't successfully convey them to you then I as a filmmaker have failed. That said, let's talk about the problems with this piece.
PROBLEMS
The biggest problem I had with this piece was staying true to the learning objective, and my project suffered because of it. Let me repeat the goal of the project:
"The goal of this exercise is to explore the externalization and motivations of character, through visual elements, and through the use of a basic 3-act structure."
The "visual elements" statement really came back to bite me in the butt. While planning out my story for this project, I storyboarded out the flashback sequence of the girl, as you saw, but wrote in the notes a line of dialogue to be voiced-over the flashback along with romantic music. While I was cutting the piece together in editing, my instructor walked over and watched it back with me before I had a chance to add in the voice over and music. "What's going on with that staircase scene?" he asked. I explained to him that I was going to add a voice over to explain that he planned on buying her an engagement ring, and hence the close up on her hand which is absent of a ring. I also said that a romantic music track would help set the tone. My instructor proceeded to tell me that that would be in violation of the prompt and that I was not allowed to do that. At first I was really frustrated. Suddenly, my story wasn't as complete as I had hoped it would be. My professor stressed to me after that the importance of telling a story visually. He acknowledged that music and sound could play a huge part in a story, but so could visual elements. He said we would be tackling each element one at a time until we were able to piece them all together in our F1 project. For the sake of this particular weekend project, and the next several few, we were to be focussing solely on the visual elements. After that sunk in, I realized the importance of the visual elements. I went into my third weekend project with a much more level head about the objectives of the weekend projects, and didn't care as much about the overall quality of the video as I did about how I was using the frame to convey a story.
HOW I DID IT
This project posed a couple of technical challenges for me, so if you are interested at all in some technical specifics of filmmaking read on.
First off was my rack focus. With the DSLR video revolution, rack focusing has become a powerful tool for the amateur filmmaker to utilize that was previously unavailable. Filming on DSLR's myself, I had become very accustomed to using the rack focus shot to capture certain shots. I really wanted my opening shot to rack focus from one pool ball to the next, so that the obstacle of the yellow ball in the middle of the shot was clear. However, the cameras we are using to film our weekend projects (the Canon XF305) is really designed for broadcast television where most everything stays in focus. With the 5mm lens on the XF305, it is really really difficult to get any significant depth of field. In order to pull off the rack focus shot of the pool balls, I had to get really really far away from the pool table and zoom in as far as the camera would let me. That is the only way to pull good focus on these broadcast video cameras, but it turned out effective, despite the difficulties.
Second was the slow motion. I wanted smooth slow motion, so I upped the frame rate to 60 fps. However, some of you might have noticed the 1080p HD setting on YouTube and might be pointing out that 1080p60 doesn't exists. Indeed, you are correct. BUT 1080i60 DOES exist. I shot the shot using interlaced scanning instead of progressive. The advantage? I got the appearance of 60fps. The disadvantage? My shots were now interlaced. To make sure I didn't get any interlacing artifact on those shots I kept the camera as still as possible by locking it down on a tripod and making sure my actress didn't make any exaggerated movements. Adobe Premiere can handle dropping progressive and interlaced footage onto the same timeline, so I conformed the frame rate down from 30 to 15 (even though it is 60i, 60i is simply 60 half frames per second, so it comes out to 30fps total) and dropped the 15p (30i) footage into my 24p timeline and let Premiere do it's thing. It turned out great and I'm really happy with it. The overall quality of the slow motion is much much better when shot at 60i and slowed down as opposed to left at 24p and attempting to slow that down.
I got permission from my classmates to post some of their videos on my blog. These are videos from the first weekend project that I acted in. I'm by no means a stellar actor, and I definitely don't want to make acting my career, but it is fun to do and it is something I definitely have to understand if I am going to be a filmmaker. If you recall, the first weekend project was called "Lost and Found" and was about a character who loses something and then has to find it within one continuous shot. I hope you enjoy my classmates' work and my superior acting chops! ;)
The prompt for the first weekend project was simple: a character loses something and then finds it. The difficulty was in the challenge: the entire project had to be one continuous shot and under one minute. So without further ado, here is the my first weekend project!
So this video might be a little confusing to you at first glance - and I don't blame you, even I still don't fully understand it. FSU is a very story oriented film school. In the industry, the quality is always going to be there. With a $60,000 RED camera, super computers, and cheap outsourcing of special effects to Asia, the films coming out of Hollywood are always going to look fantastic. So the philosophy of the professor's at FSU is to teach us to make a compelling story. With that in mind, I wanted to be creative with a topic like "Lost and Found." It would be really easy to make a video about losing your cell phone or car keys, so I decided to get as abstract as possible. I thought to myself, "What can you lose but not find?" I immediately thought about virginity. How could a person get their virginity back? As a sci-fi buff, I came up with the idea of a time machine. However, with no special effects and a single tracking shot, I knew it would be really difficult to pull off. I came up with the idea of contrasting day and night, and using a Calendar to show the passage backwards in time. Our professor wouldn't let us do color correction on the video, so I had to rely wholly on the calendar. If you look carefully at the dates, you will see that the calendar actually flips back one day. To pull off that "magical moment" where time rewinds, we shined a bright flashlight into the lens. While the flashlight was flaring the lens, my crew quickly cleaned up my room, opened the blinds, made the bed, and my male actor got dressed. That way, when our actress got back into the bedroom, fully dressed of course, everything looked different. (If you look closely at the bottom left corner of my screen, you can see one of my crew members hiding behind the bed.) So after I submitted the assignment I went back and re-edited this project, just so that I could see it the way it was in my head. What resulted was the following video:
I think this version looks really nice. The day-to-night conversion turned out well and the image stabilizer made everything look much smoother. I had to letterbox the video get rid of some of the crop factor from the stabilizer, and even though I think the widescreen looks nice, it crops out the month on the calendar which is a major downside. This just goes to show the dangers of filming a project in 16:9 and cropping it down to 2.35:1 in post.
Problems
All that aside, let's look at some of the big problems with this video and what I learned from it. The biggest criticisms I received from my professor and classmates was that they weren't able to clearly follow what was going on. They grasped the concept that the boy and girl had slept together and that the girl had regretted her decision, but almost no one made the leap from that to "girl steps into time machine to regain virginity." Believe it or not, some students did pick up on the time machine, but the ones that did all believed she went forward in time because the calendar switched from a month with no strikethroughs on the dates to a month full of strikethroughs, giving the appearance of moving forward in time even though the calendar was in fact flipped back. The reason for this was that I didn't focus on the month of "July" long enough. The word July only has about 1 second of total screen time as compared to June which sees 5 or 6. I also got some comments on set dressing. Although everyone realized that the guy and girl had slept together, many people said it wasn't clear that the girl was supposed to have lost her virginity. One student suggested that I use more props, like perhaps open alcohol bottles and various sexual items around the room.
This video was a great exercise in showing a story, not telling one. I learned a lot about utilizing all kinds of visual elements like props, camera movement, and location to tell a story without dialogue.
A Christian Outlook on Sex in Film
This was a pretty intense subject for me to tackle in my very first project in film school. I had never explored sex before in any films I had made, and here I was about to explore it in a graded project that was going to be screened in front of a class of 20 year-olds and my professors. As a Christian, I don't think there is anything wrong with exploring sex in film. Sex is a part of life, and film is form of art. It is art's duty to explore different parts of life. I do think it is wrong to glorify premarital or extramarital sex in film; sometimes they can be necessary to tell a story and bring to light a greater message, but I think presenting them as good things is crossing the line. I also think it is wrong to use film as stimulus for people's lustful desires. Why must we get up close and personal on a woman during a sex scene? Often times the implication of sex is all that is needed to advance the story in a movie - we as an audience absolutely don't have to see that when it is not necessary. Sometimes, however, I believe it is necessary. Nudity as a whole in film is a slightly different issue though - I believe sometimes it can be useful to make a more powerful point. In Stanley Kubrick's A Clockwork Orange, a young woman gets raped by Alex's gang. Kubrick, just wanting to be raw and show the audience the true horrors of rape left nothing out. We see the woman completely naked in a series of long takes. It is a horrible scene, and I hate watching it, yet I believe it serves an important place in art. It really shows the horrors and dangers of gang violence and rape in a way that a censored rape scene never could. That scene from Kubrick powerfully inspires people to go out and try to help other people that are put in similar situations. I believe that exploring the harsh realities of life is something that film not only can do, but something that film should do. Sex is no different. In my opinion, I have an obligation to objectively explore these realities of life; I should not glorify what doesn't need to be glorified, yet I should not censor things that shouldn't be censored. As a Christian, I believe in one truth. Part of that truth is an objective reality that we live in. As a Christian filmmaker, I would like to capture that objective reality on screen, hopefully leading people to the conclusion that there is one objective truth and that that truth lies in the Lord our God and his son Jesus Christ.
One of my first experiences here at film school were the weekend projects. Starting our very first weekend, we were split into 3 five-man crews, given cameras, microphones, tripods, and prompts. We have to make a one-minute project each weekend.
Each weekend project consists of two parts: a story prompt and a filmmaking focus or challenge. The story prompt is to help give us ideas of something to shoot. The filmmaking focus is basically exactly what it says: it gives us something to focus on while we shoot. There will be seven weekend projects in total, so keep checking them out whenever you get a chance!
Pictured here is my weekend project crew. That's me on the left, then Justin, Elangie, and Grace. Not pictured is Victoria, who is taking the photo. :)
I've Got to Clear This Stuff Up Early So You Can Understand What I'm Even Talking About
Before I go off writing away about my experiences here and what I have learned, there is some technical and colloquial jargon I have to clear up for you. Let's start with the easier stuff.
Here at the film school, my classmates and I refer to ourselves as the
FSU CMPA BFA A&DA 1
Each one of these letters means something, so let me translate it for you:
The Florida State University College of Motion Picture Arts Bachelor in Fine Arts Animation and Digital Arts First Year
But basically we abbreviate that to BFA 1. The reason that this is important is because there is also a class above us, better known as the FSU CMPA BFA A&DA 2 - or simply, the BFA 2's. Next year, I will become a BFA 2 and the current BFA 2's will become BFA 3's. You get the idea. So if I say "I was working with a BFA 2 on their project" all I basically am saying is that I was working with an upperclassman.
Now, this has the potential to get confused with another abbreviation system - the way we name our films. It's simple really; here at film school we make four films: Film 1, Film 2, Film 3, and Thesis. However, since filmmakers are like doctor's and for some reason can't stand to write anymore than they have to when it's not in a screenplay, we simply abbreviate the word "Film" to F. As a first year, I am currently working on my first film, my F1. The BFA 2's are currently working on their third film, their F3's.
Now let's move on to some of the technical stuff. If you have no interest in the technical specifics of anything I make, you can skip this part and move right along. But if you have no experience in filmmaking want to try to follow some of my more technical blogs, you might want to brush over this first. I'm just going to list some terms and define them:
Adobe - Company that makes creative software
Premiere Pro - The software made by Adobe that we edit our films in
After Effects - The software made by Adobe that we use for animating and compositing
Audition - The software made by Adobe for mixing sound in our films
Photoshop - Graphic Design software made by Adobe
Illustrator - Illustration software made by Adobe
Speedgrade - Color Correction software made by Adobe
CS6 - Literally "Creative Suite 6"; the collection of the above softwares we use at school
CC - Literally "Creative Cloud"; the successor to Adobe CS6 and the software I use at home.
GarageBand - Free music software by Apple
Logic - Expensive music software by Apple
ProTools - Sound editing software
Nuke - High end special effects software
Maya - 3D modeling software for special effects
Z Brush - 3D modeling software for special effects
Da Vinci Resolve - High end color grading software by BlackMagic Design
1080p - HD footage shot "progressively" which means there is no horizontal interlacing
24fps - 24 frames-per-second, the frame rate of film
RED - A brand of super high definition cameras now used in Hollywood
Aspect Ratio - the ratio of the size of your viewing screen presented in length to height
16:9 - typical digital aspect ratio (the ratio of your widescreen TV)
4:3 - old school analog ratio (the ratio of your big old boxy square TV that Grandma watches)
2.35:1 - the aspect ratio of film (that's why you get black bars on the top and bottom of your TV when watching movies, because 2.35 is wider than 16:9)
That should just about cover it. I know that this is a relatively boring post, but I don't want you to get lost in jargon. So NOW you can start reading my blogs haha. It could potentially be a dark place... so May The Force Be With You!
Cinelosophy! Welcome to my first steps into the bold world of blogging as I take my first steps into the bolder world of film. I decided to create this blog for a couple reasons. Mainly, I want my friends and family back home to be able to see some of my work from film school; so Mom, Dad, Steph, friends and family - here's where you can do that! But in addition to that, I want to go deeper into what each project meant to me. I want to explore my own thought processes, the meaning behind each project and each decision I made, and exactly how I planned to pull it off... and whether I was successful at it or not. I also will talk about what I learned from each project and how it helped shape me as a better filmmaker. Finally, I'll just be posting some updates on every-day life I guess. After all, isn't that what blogs are for?
For those of you on the interwebs who might have just stumbled across my little endeavor here and found yourselves interested, let me briefly introduce myself. My name is Austin Baur. I am a sophomore and first-year film student at Florida State University. I'm 19 years old, a Christian, and love music, basketball, science, and art on top of film. Hopefully all of this together can make for an interesting little blog. :)
So whether you are a friend or family member just stopping by to see what I'm up to, a real techie trying to pick up a thing or two, or just want to get inside my head (in a totally noncreepy way that is), I hope that you can find something of value here on my blog, Cinelosophy.