This project was a lot of fun to shoot. Just a simple chase scene, but that gives you such much freedom as a director to just have fun with it. So here is my project "The Pursuit"!
In this project I really wanted to focus on foreground objects. Placing elements in the foreground in front of your actors in the midground can really add so much depth to the frame. In a chase scene, it also adds a lot of opportunities to hide your cuts and have some really great transitions from shot to shot. In this video I would cut on cars a lot, giving the illusion that if the girl ran behind the car the guy came out the other side. Curiously, our minds understand that there was a cut made there and that there was no teleportation magic, even though the cut is hidden. I'm not really sure why that works but it does, and it is a great tool to keep in your arsenal as a director.
Also, my last shot is a shot where I went against my gut and did what my instructor and I had talked about after my third weekend project. If you flip back to my post on weekend project 3, you'll see that I talk a lot about a shot where I could have framed my actress in a clear patch of sky, but instead I placed her right in front of a tree. On my last shot in this project, my gut told me to have a good amount of spacing between my two actors. But when I did that, I lost the detail of my actor's face in trees, skin-tone buildings, and light posts. I decided to squeeze my two characters closer together, against my initial desire, and the result was great! Take a look at the screenshot below:
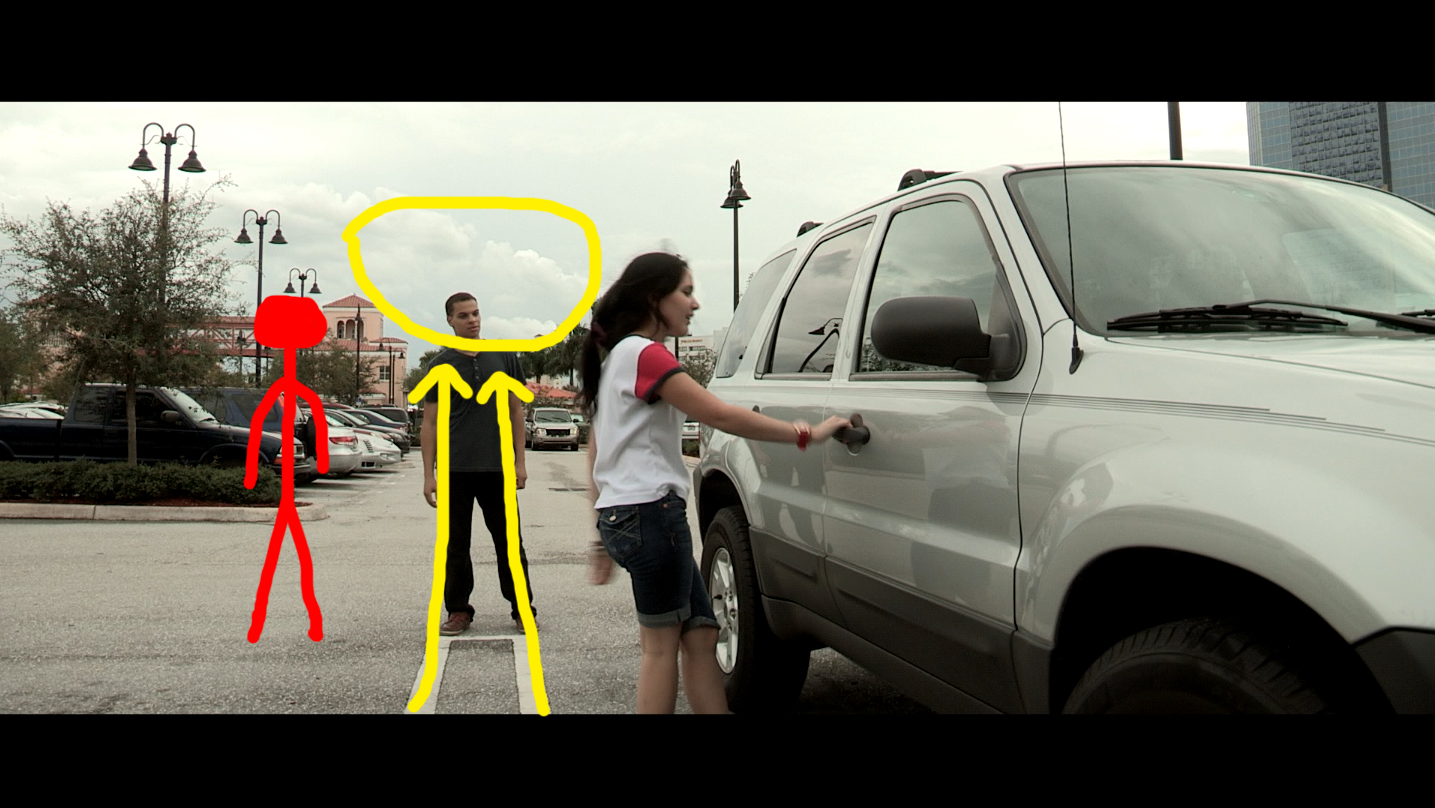
The red stick figure represents where I wanted to frame the actor. Look at how cluttered that area of the frame is. Instead, I have this nice patch of sky which, as luck would have it, neatly vignette's his head with a nice circular arch. In addition, the lines from the parking space lead straight up to that circle on either side of his head, giving us vertical framing lines in addition to the vignette frame. I think this shot turned out awesome and I am really glad that I was able to use what I learned from my last weekend project to make this one better.
CONTINUITY
When I screened this project to some classmates and my parents, a common criticism I received was that the distance between the two runners was always chaining, and they could never gauge whether or not the pursuer was catching up or not. To be honest, this is something I totally neglected on set. It is so easy to get caught up in each individual frame and lose sight of the picture as a whole. This is just something for all of us to keep in mind of in the future. Continuity is extremely important.
SOUND
On this project I decided to give Adobe Audition a go for the first time. I had used it briefly before but had never tried mixing in it. Being familiar with Garage Band and also live sound mixing (I used to run boards for my church in the past) was a huge help coming into Audition. I learned a lot about sub mixing through bus tracks and limiting/normalizing audio to proper peaks. I still have a lot to learn, and I have been watching some Lynda tutorials on the proper ways to mix film in any standard DAW, and trust me it is no easy task. Hopefully I'll be able to write and in depth blog on it in the future.
As for the music, I recorded the guitar parts straight into audition in a new multitrack session. I made the string tracks and percussion tracks in Garage Band using the Main Stage jam packs, then bounced those back into audition to do some mixing. I find that the limited mixing tools in Audition are superior to the many in Garage Band. Compression and Reverb applied in Audition helps the drum tracks bounce right back into the real world, not sounding like MIDI anymore, as opposed to compression and reverb in Garage Band which leave things sounding digitized. Then I bounced that multitrack session to a new file and brought it back into my regular sound mix which included my dialogue and sound effects. Then viola - a finished mix.
After mixing this project in Audition, I was quite impressed with its capabilities, especially considering it is a DAW no one ever talks about. The only DAWs anyone ever seems to mention are Pro Tools, Logic, Ableton, and Reason. I hear some talk of Cubase too and I know some kids with copies of FL Studios, but in all honesty it seems like the Pro Tools is king. That being said Audition was a far superior mixing tool to Premiere and Garage Band, so I am curious to see what any pros think of it, though I am hard pressed to really find any reviews online. I encourage all of you to give Audition a try!
Again, for my few readers out there sorry I've been gone so long. Three more weekend projects to post and then I can start getting into the good stuff!